Some of the best tools in the trades are the simplest ones.
A homemade soapstone holder is a perfect example. It doesn’t require complicated machining, expensive material, or an afternoon in the fabrication shop. With a small piece of scrap metal and a little creativity, you can build a durable holder that protects your soapstone and makes it easier to use.
For welders, pipefitters, boilermakers, ironworkers, and fabricators, soapstone is one of those little items that seems to disappear constantly. It breaks in your pocket, falls out of your shirt, gets buried in the gang box, or becomes too short to comfortably hold.
A metal holder solves much of that problem.
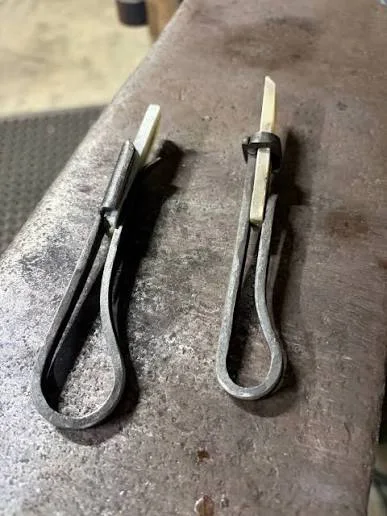
What Is a Soapstone Holder?
A soapstone holder is simply a reusable metal body that grips a piece of welding soapstone while leaving enough exposed to mark steel.
Instead of holding the soapstone directly with your fingers, you hold the metal body.
As the soapstone wears down, you reposition it farther out of the holder.
Commercial versions are inexpensive and widely available, but this is also one of the easiest small tools to fabricate yourself.
The homemade version can be made from scrap tubing, small round stock, flat stock, or other suitable material already sitting around the shop.
It’s another example of the shop-built ingenuity found throughout the skilled trades. You can find more fabrication and pipefitting content in the Næxon Resources Center.
Why Use Soapstone?
Soapstone has been used around welding and metal fabrication for generations because it makes highly visible marks on steel while tolerating heat much better than many conventional marking tools.
A fitter can use it for:
- Cut lines
- Centerlines
- Reference marks
- Fit-up marks
- Pipe layout
- Structural layout
- Orientation marks
- Welding references
Unlike permanent ink, soapstone markings can generally be removed relatively easily.
That makes it especially useful when laying out steel before cutting, fitting, or welding.
Why Build a Homemade Holder?
The biggest advantage is protection.
Bare soapstone is brittle.
Put a stick in your pocket with bolts, wedges, a tape measure, flange pins, and everything else a fitter carries around, and eventually you’re probably going to pull out several smaller pieces of soapstone.
A metal holder protects most of the stick while exposing only the amount needed for marking.
It also provides something larger and stronger to grip.
And because the holder itself is reusable, you simply replace the soapstone when it’s consumed.
The Basic Design
There are many ways to build one.
Don’t get too concerned about making your holder look exactly like somebody else’s.
The basic concept is what matters:
Metal body → soapstone slides inside → retaining method holds it → tip remains exposed.
That’s it.
A very simple homemade version can consist of:
1. A short metal body
2. A slot or opening for the soapstone
3. A small retaining screw, spring, pinch point, or friction fit
4. An exposed marking tip
You can make it as simple or elaborate as you want.
Version 1: Small-Tube Soapstone Holder
One of the easiest versions starts with a small piece of metal tubing.
Choose tubing with an inside dimension reasonably close to the soapstone you’re using.
Cut the tubing to a comfortable length for your hand.
Something roughly pencil-sized is convenient, but there is no universal dimension because soapstone comes in different shapes and sizes.
Clean the cut ends and remove every sharp edge.
Slide the soapstone into the tubing.
If the fit is already snug enough to hold the stone without crushing it, you have the beginnings of an extremely simple holder.
The soapstone should slide when intentionally repositioned but shouldn’t simply fall out when the holder is pointed downward.
Version 2: Add a Set Screw
A more controlled design uses a small set screw.
Near one end of the metal body, drill a small hole.
Thread the hole directly if the material provides adequate thread engagement, or attach a small suitable nut to the outside of the holder.
Install a short screw.
Now the soapstone can slide into the holder and the screw can be tightened lightly against it.
The important word is lightly.
Soapstone isn’t a piece of steel.
Crank down hard on the screw and you’ll simply break it.
You only need enough pressure to prevent the stone from sliding.
Version 3: Make One From Flat Stock
If you primarily use flat soapstone, you can fabricate a holder specifically around its rectangular profile.
Start with a narrow piece of thin steel or stainless material.
Form it around a sample piece of soapstone to create a narrow channel.
The finished shape should allow the soapstone to slide lengthwise through the holder.
A small retaining screw can then be installed near the marking end.
This style can produce a very compact holder because the body closely follows the shape of the soapstone.
Step 1: Choose Your Soapstone First
Don’t fabricate the holder and then try to find soapstone that fits it.
Do the opposite.
Take the exact soapstone you normally carry and build around it.
Determine whether you’re using:
- Flat soapstone
- Round soapstone
- Rectangular soapstone
Use the actual piece as your fit-up reference.
This makes the fabrication much easier.
Step 2: Find Suitable Scrap Material
Look through the scrap bin.
You may already have exactly what you need.
Small tubing is an obvious choice, but don’t overlook other material that can be modified into a holder.
The material should be reasonably light, comfortable in the hand, and strong enough for normal pocket and jobsite use.
You aren’t building structural equipment.
You are building a marking-tool holder.
Keep it simple.
Step 3: Cut the Body
Cut the material to a comfortable length.
A good holder should be long enough to grip easily while still fitting conveniently in a shirt or pants pocket.
After cutting, deburr everything.
This is especially important for a tool you’re going to handle constantly and probably carry against your clothing.
Round the corners.
Smooth the edges.
Remove cutting burrs.
A five-minute homemade tool shouldn’t spend the next five years cutting holes in your pockets.
Step 4: Create the Soapstone Opening
Fit the soapstone into the body.
You want enough clearance for adjustment without allowing excessive movement.
For flat soapstone, the body may need to be slightly flattened or formed.
For round soapstone, appropriately sized tubing may require almost no additional shaping.
Test the movement before adding the retaining mechanism.
Step 5: Add the Retainer
The simplest positive retention system is a small screw.
Mark a location near the front of the holder.
Drill the hole.
Depending on the body material and thickness, either tap it appropriately or install a small nut or threaded boss.
Insert the screw.
Then test it with soapstone installed.
Tighten only enough to hold the stone.
If you want something even simpler, the holder can sometimes be designed around controlled friction rather than a screw.
The important requirement is that the soapstone stays where you put it during normal marking.
Step 6: Make It Comfortable
This is where a homemade tool becomes your tool.
Hold it like you’re laying out pipe.
Try marking horizontal and vertical lines.
Try it while wearing your normal work gloves.
If the holder is too short, too slippery, too bulky, or awkward to rotate, modify it now.
You can grind small flats into the body for additional grip.
You can texture the surface.
You can add a small pocket clip.
You can drill a lanyard hole.
You can even stamp your initials into it.
That’s part of the advantage of fabricating your own tools.
A Stainless-Steel Version
If you’re building one anyway, stainless steel makes an excellent holder material.
A small stainless body is durable, corrosion-resistant, and can be cleaned easily.
It can also make sense in fabrication environments where controlling carbon-steel contact with stainless workpieces is important, although the entire shop’s material-segregation and contamination-control procedures still need to be followed.
A dedicated stainless holder can simply be marked:
SS ONLY
Then keep it with your stainless fabrication tools.
Næxon covers additional tools, workwear, and equipment used throughout industrial fabrication in the Næxon Learning Center.
Add a Pocket Clip
Here’s one modification that can make the homemade version considerably better.
Add a clip.
A small piece of spring material can be formed and attached along the side of the holder.
Now instead of dropping the holder loose into your pocket, you can clip it onto the edge of a shirt pocket or tool pouch.
Keep the clip smooth and compact so it doesn’t become another snag point.
For someone who uses soapstone all day, this tiny modification can be surprisingly useful.
Make the Soapstone Adjustable
Don’t expose the entire stick.
One of the reasons for using a holder is to protect it.
Keep most of the soapstone inside the body and expose only enough to make a comfortable mark.
As the tip wears down:
Loosen the retaining screw.
Slide the soapstone forward.
Retighten it lightly.
Keep working.
When the remaining piece becomes too short to use effectively, remove it and install another stick.
Round vs. Flat Soapstone Holders
Both styles work.
Round soapstone naturally works well with tubular holders.
Flat soapstone can provide a different marking feel and is often used for sharper layout lines.
If you use both regularly, there’s no reason you can’t build two holders.
Mark one for round soapstone and another for flat.
You’re working with tiny pieces of scrap material, so once you’ve figured out a design you like, making a second one takes very little additional effort.
Don’t Overcomplicate It
This is probably the most important part of the project.
A soapstone holder doesn’t need twelve components.
It doesn’t need precision bearings.
It doesn’t need an elaborate locking mechanism.
It doesn’t need to look like something designed by NASA.
A piece of scrap material that securely holds soapstone and feels comfortable in your hand has accomplished the job.
The best shop-built tools often work because they’re simple.
The Tool Doesn’t Make the Layout
A good soapstone holder makes marking easier.
It doesn’t replace accurate layout.
The fitter still has to establish the correct dimensions, centerlines, orientation, cuts, and reference points.
Soapstone simply records those decisions on the material.
That is why marking tools sit beside tape measures, squares, levels, wraps, and other layout equipment in practically every fabrication environment.
If you’re building out your everyday industrial tool setup, you can also explore Næxon industrial tools and gear.
One Piece of Scrap Can Become a Tool for Years
That’s really what makes projects like this enjoyable.
The piece of tubing you use might otherwise have gone directly into the scrap hopper.
Instead, twenty minutes of fabrication can turn it into something you carry for years.
That’s the same mentality behind homemade pipefitter dogs, doghouses, push-pulls, jack-stand clamps, and countless other shop-built tools.
Experienced tradespeople look at leftover material differently.
Sometimes scrap is scrap.
Sometimes it’s tomorrow’s tool.
Final Thoughts
A homemade soapstone holder may be one of the easiest fabrication projects a welder or pipefitter can build.
Start with the soapstone you normally use.
Find a suitable piece of scrap tubing, flat stock, or stainless.
Cut it to a comfortable length.
Shape the body around the soapstone.
Deburr everything.
Add a small retaining screw or other simple holding method.
Slide in the soapstone.
Leave a short marking tip exposed.
And put it to work.
It doesn’t have to be pretty.
It doesn’t have to be complicated.
It just has to hold the soapstone, protect it, and make your layout work a little easier.
That’s the beauty of a good homemade tool.
For more pipefitting, welding, fabrication, and blue-collar knowledge, explore the Næxon Resources Center.