Some of the most useful pipefitter tools aren’t sitting in a catalog.
They’re made in the shop.
A piece of small-diameter pipe. Two pieces of round stock or bolts. A welder. A few measurements.
That’s about it.
The result is a simple homemade flange wrench, sometimes called a flange turner, flange turning wrench, or flange spanner depending on the crew. The basic idea is simple: two pins engage two bolt holes in a threaded flange while a steel handle gives the fitter enough leverage to rotate the flange onto or off threaded pipe.
It’s one of those tools that looks almost too simple to deserve a name.
But when you’re trying to thread a flange onto a piece of pipe and need controlled leverage without fighting the flange by hand, you’ll understand exactly why somebody made one.
This guide explains what the tool is, how it works, how to fabricate one, and some of the details that can make a homemade flange wrench considerably better than two random bolts welded onto a piece of pipe.
As with any shop-fabricated tool, it should only be used where permitted by your employer or facility. The finished tool should be inspected before use, and it should never be used for lifting, rigging, or loads beyond what its materials and fabrication can safely withstand.
What Is a Homemade Flange Wrench?
A homemade flange wrench is essentially a two-pin spanner with a long handle.
A piece of small-diameter steel pipe or solid bar forms the handle. Near one end, two steel pins or bolts are welded into position.
Those two pins are spaced so they fit into two bolt holes on the flange.
Once the pins are inserted into the flange holes, the handle provides leverage to rotate the flange.
The principle couldn’t be much simpler:
The flange bolt holes become the engagement points, and the steel handle becomes the lever.
Instead of trying to grab the outside diameter of the flange, the tool transfers turning force through two of the flange’s bolt holes.
What Is It Used For?
This homemade tool is particularly useful when installing or removing threaded flanges.
A threaded flange has internal pipe threads that allow the flange to screw directly onto externally threaded pipe.
You can normally start the flange by hand. As the connection progresses, however, rotating the flange becomes increasingly difficult.
That’s where this little homemade tool earns its place in the gang box.
Insert the two pins into appropriate bolt holes and use the handle to rotate the flange.
The additional leverage allows the fitter to turn the flange much more easily than trying to wrestle it around by hand.
This tool shouldn’t be confused with two-hole flange pins. Both tools interact with flange bolt holes, but they serve different purposes.
Two-hole pins are primarily alignment and positioning tools. A flange wrench is a turning tool.
Why Pipefitters Make Them Instead of Buying Them
Because the tool is almost embarrassingly simple.
A fitter may already have everything required to make one sitting in the scrap area:
- A suitable piece of steel pipe or solid bar
- Two suitable steel pins, pieces of round stock, or bolts
- Welding equipment
- Grinder
- Measuring and layout tools
There are no bearings.
No adjustment screws.
No complicated mechanisms.
No moving parts.
And a basic fixed-size version doesn’t require complicated machining.
Once you’ve established the correct pin spacing and fabricated the tool properly, you have an extremely simple tool that can potentially remain in the gang box for years.
That’s exactly why homemade tools like this have existed around fabrication shops and industrial jobsites for generations.
Before Fabricating It: Decide What Flange It Is For
Don’t start welding yet.
First decide exactly which flange pattern you’re building the tool around.
Flanges vary.
Pipe size, pressure class, number of bolt holes, bolt-circle diameter, and bolt-hole diameter can change.
A fixed two-pin flange wrench shouldn’t automatically be assumed to fit every flange simply because its pins happen to enter the holes.
The easiest method is to fabricate the wrench around a known flange pattern that you regularly use.
If you’re making the tool for repeated shop use, identify the finished wrench so everyone knows which flange pattern it was designed for.
That prevents someone six months later from finding a homemade tool in the gang box and assuming it’s universal.
Materials You Will Need
The materials for a basic flange wrench are straightforward.
You’ll need a suitable piece of steel pipe or solid bar for the handle. Small-diameter pipe is commonly used because it’s easy to handle, easy to weld, relatively lightweight, and provides useful leverage.
You’ll also need two steel pins.
Many field-made versions simply use bolts because they’re readily available. A more purpose-built shop version might use appropriately selected solid round stock.
The pin diameter should fit into the intended flange holes with enough clearance to insert and remove the tool without excessive looseness.
You’ll also need ordinary fabrication equipment appropriate for the materials you’re working with: measuring tools, square, layout tools, grinder, welding machine, clamps, and required PPE.
Step 1 — Select the Handle
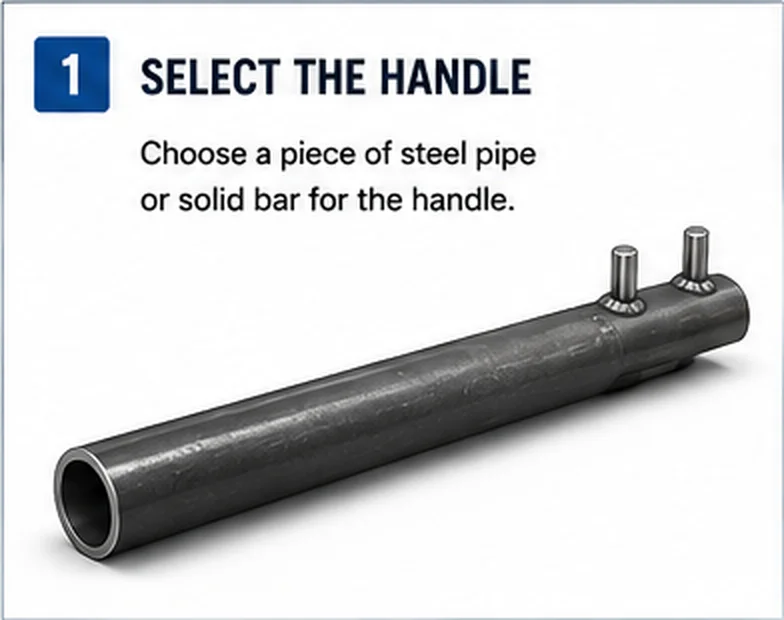
Start with the handle.
A piece of small-diameter steel pipe works well because it’s inexpensive, easy to fabricate, and comfortable enough to use as a lever.
The handle should provide enough leverage to make turning the intended flange practical.
That doesn’t mean longer is always better.
Increasing handle length increases the torque that can be generated for the same amount of force. Eventually, instead of making the job easier, you’re simply making it easier to overload the pins, welds, flange holes, threaded connection, or the tool itself.
The goal is controlled leverage, not maximum possible leverage.
Inspect whatever material you’re using before fabrication. Severely corroded, cracked, damaged, or questionable scrap shouldn’t suddenly become a hand tool just because it happens to be lying beside the welding table.
Step 2 — Determine the Pin Spacing From the Actual Flange
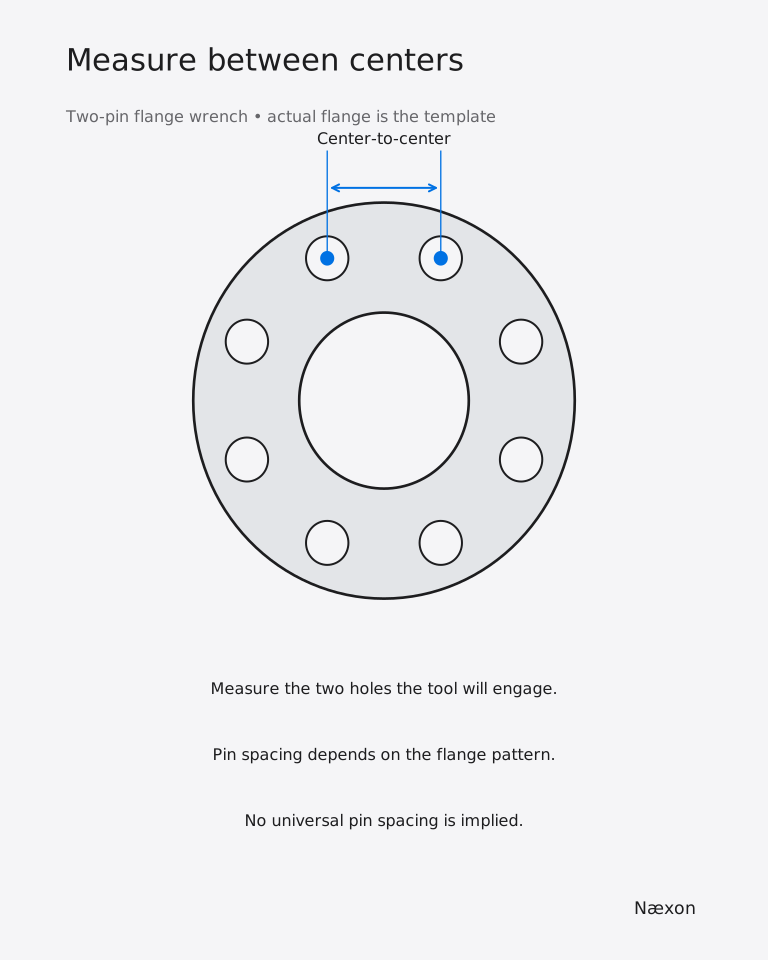
This is the measurement that makes or breaks the tool.
Take the flange pattern the wrench is intended to fit and determine the center-to-center spacing between the two bolt holes you want the wrench to engage.
What matters is the center-to-center relationship between the two pins.
One of the easiest fabrication methods is using a spare or template flange of the correct pattern as your layout reference.
Insert your two pins into the selected bolt holes.
Make sure they fit freely.
Then position your handle against the pins and establish where they need to be attached.
Using an actual matching flange or accurate template greatly reduces the chance of making a beautiful-looking flange wrench that doesn’t actually fit the flange.
And every fitter knows exactly what happens when the pins end up slightly too close together.
Somebody blames the tape measure.
Step 3 — Choose Which Bolt Holes the Tool Will Engage
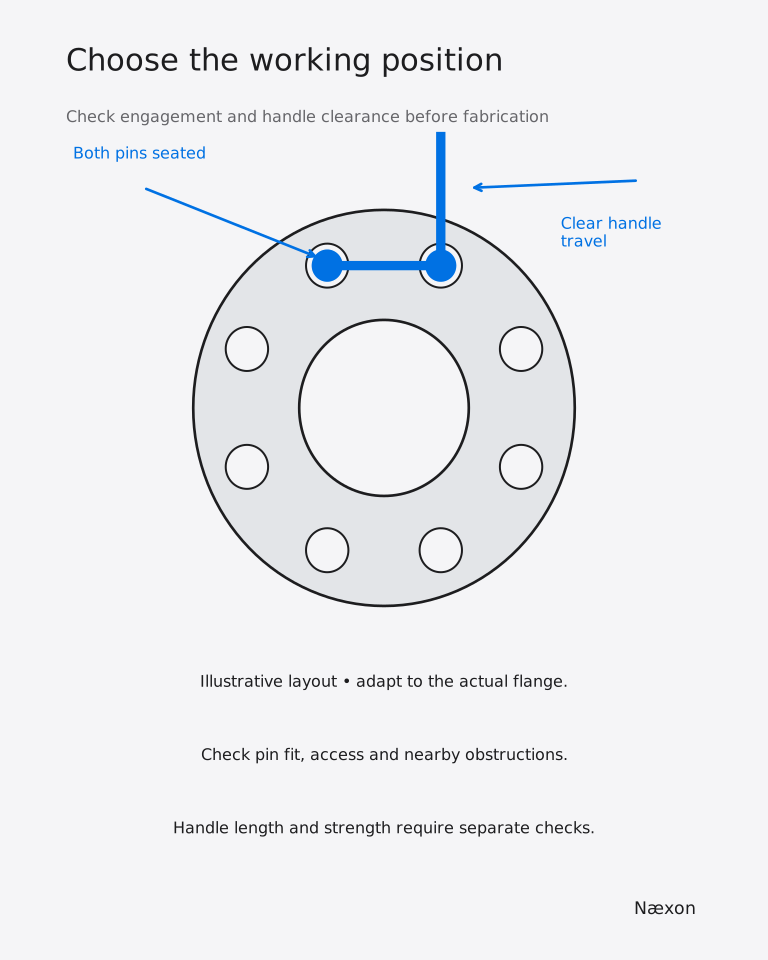
Think about which two holes will give the wrench a stable working position.
The tool should engage both holes securely while allowing the handle to sit in a practical position.
You want the wrench to:
- Seat easily
- Engage both holes properly
- Remain reasonably stable
- Provide useful leverage
- Clear nearby components when possible
Mocking up the tool against the actual flange pattern before welding makes this much easier.
You’re not just building something that fits two holes.
You’re building something somebody needs to comfortably use.
Step 4 — Prepare the Pins
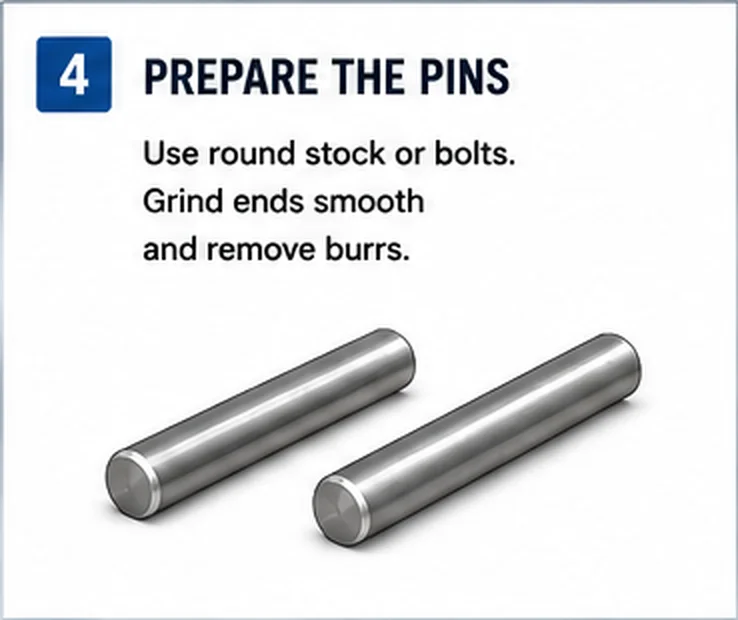
Now prepare the two pins.
If you’re using bolts, choose suitable material and dimensions for the intended application rather than simply grabbing the first two bolts you find.
The pins should be straight and in good condition.
Remove sharp burrs and rough edges from the portions that will enter the flange holes.
You want the pins to enter and exit without unnecessarily gouging or binding against the flange.
They don’t need to fit like precision dowels.
A little clearance is useful.
What you don’t want is excessive looseness.
If the pins are dramatically smaller than the bolt holes, the wrench can shift before both pins begin sharing the load.
Step 5 — Lay Out the Handle
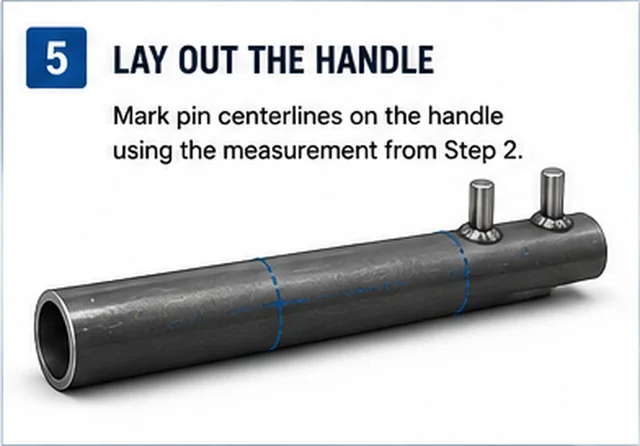
Transfer your two pin locations onto the handle.
Clearly mark both centerlines.
Verify the center-to-center spacing.
Then verify it again.
This is one of those jobs where five extra minutes of layout can save thirty minutes of grinding welds off later.
Before tacking anything permanently, physically check your pin locations against the flange or template.
When appropriate, a scrap or template flange can serve as a simple fitting jig to establish the correct relationship between the pins.
Avoid using an actual service component as a welding fixture unless your employer’s procedures specifically permit it.
Step 6 — Keep Both Pins Parallel
Correct spacing isn’t enough.
The two pins also need to remain reasonably parallel.
If one pin leans inward while the other leans outward, they might start into the flange holes but bind as the wrench is seated farther.
Crooked pins can also produce uneven contact.
Use a square, fixture, or another appropriate layout method to keep both pins aligned during fit-up.
This is one of those little fabrication details that separates a tool that feels good every time you use it from one you have to fight every time you pick it up.
Step 7 — Tack the Pins First
Don’t immediately finish-weld everything.
Tack both pins securely enough to hold their positions.
Then stop.
Let the assembly stabilize and test it on the intended flange.
Both pins should enter the holes without requiring a hammer.
The tool should seat properly.
And just as importantly, it should come back out without a fight.
Check the spacing.
Check the parallelism.
Check how deeply the pins engage.
Check the handle position.
Check surrounding clearance.
If anything needs adjustment, now is the time.
Grinding off a couple of tack welds is much easier than cutting apart two completed welds.
Step 8 — Weld the Pins to the Handle
Once you’ve confirmed the fit, complete the welds using an appropriate welding procedure and good fabrication practice for the materials involved.
Remember where the force is going.
When somebody pulls on the handle, the turning load transfers through those pin connections.
The welds therefore aren’t decorative.
Poor fusion, cracking, severe undercut, questionable base material, or other significant defects are reasons to repair or reject the tool.
Don’t assume an enormous weld automatically makes a homemade tool stronger.
Proper material, good fit-up, appropriate joint design, and sound welding matter far more than simply piling weld metal around a bad connection.
Step 9 — Let the Tool Cool and Check It Again
Welding causes movement.
Even something this simple can distort as it heats and cools.
Allow the tool to cool appropriately after welding.
Then put it back on the flange.
Both pins should still enter freely.
If the wrench fit perfectly when it was tacked but doesn’t fit after final welding, distortion may have changed the spacing or pin alignment.
That’s why test-fitting before and after welding is important.
Step 10 — Clean Up the Finished Tool
Once the fabrication is complete, clean the tool.
Remove sharp edges.
Remove troublesome burrs.
Clean weld spatter from areas that could contact your hands or interfere with the flange.
Inspect the handle for anything that could cut or snag a worker during use.
The wrench doesn’t need to look like something machined for a display case.
It’s a shop tool.
But there’s no reason a homemade tool has to look like it was fabricated during a power outage either.
A few minutes of cleanup makes it considerably better to use.
Step 11 — Mark What the Tool Fits
This step is easy to overlook.
Mark the intended flange application somewhere on the handle.
Stamp it.
Engrave it.
Use another durable identification method permitted by your shop.
If several homemade flange wrenches eventually end up in the same gang box, identifying them saves everyone from testing one after another until something fits.
A simple tool becomes much more useful when the next fitter immediately knows what it’s intended for.
Step 12 — Inspect and Test It Before Putting It to Work
Before relying on the wrench, inspect the entire assembly.
Look at the handle.
Look at the pins.
Look at the welds.
Verify engagement.
Make sure the pins seat sufficiently in the intended flange holes.
Make sure the wrench isn’t excessively loose or rocking badly.
Initial use should be controlled.
If the handle bends, a pin moves, a weld cracks, or anything else changes during testing, remove the tool from service and determine why.
Don’t give it “one more try.”
How to Use the Homemade Flange Wrench
Using the finished tool is straightforward.
Start the threaded flange correctly onto the threaded pipe according to the applicable installation procedure.
Make sure the threads are properly engaged.
Never use additional leverage to force a connection that may be cross-threaded.
Once additional turning force is appropriate, insert both pins into the selected flange bolt holes.
Make sure both pins are properly engaged.
Then apply controlled force to the handle to rotate the flange.
Reposition the wrench as necessary and continue turning.
The important word is:
Controlled.
A steel lever can generate significant torque.
If the flange suddenly refuses to move, don’t automatically add a giant cheater pipe and invite another fitter to hang off the end.
Stop and determine what’s preventing movement.
Don’t Treat the Flange Holes Like They’re Indestructible
The flange bolt holes weren’t created specifically to accept homemade leverage tools.
The wrench should engage them without unnecessarily damaging them.
Pins that are significantly undersized can concentrate contact.
Rough pins can gouge.
Excessive leverage can damage the flange, tool, threads, or other components.
That’s another reason the pins need to be properly sized and the tool needs to be used with control.
Just because the wrench came from the scrap pile doesn’t mean it should be treated like disposable scrap.
A Better Shop Version
The simplest version is exactly what we’ve described:
One handle. Two pins. Two welds.
For some shop applications, however, a more robust design might incorporate a steel head or plate at the working end of the handle with the pins attached through or to that plate.
That can make layout easier and provide additional material around the pin connections.
However, once you’re moving into heavier-duty leverage tools and higher expected loads, engineering considerations and employer requirements become increasingly important.
Adding thicker steel doesn’t automatically establish a safe working capacity.
Why Several Fixed Wrenches Can Be Better Than One Adjustable Tool
If your shop regularly works with several threaded flange sizes, you may be tempted to build one adjustable flange wrench.
It can be done.
But adjustability introduces more components, locking mechanisms, slots, wear points, and opportunities for incorrect setup.
Sometimes the old-school solution is better.
Make several simple fixed tools.
One for one commonly used flange pattern.
Another for the next.
Another for larger work.
Mark each one clearly.
Simple tools are usually easier to inspect, understand, repair, and replace.
Homemade Flange Wrench vs. Two-Hole Pins
These two tools can look related because they both use flange bolt holes.
Their jobs are different.
Two-hole pins are primarily used for positioning and alignment.
A flange wrench uses two bolt holes as engagement points for rotating the flange.
Don’t substitute one for the other simply because both happen to fit into flange holes.
Næxon carries pipefitter tools alongside the shop-fabricated tools that have always been part of industrial trade culture. You can explore current Næxon tools and gear through the main Næxon collection.
Why Homemade Tools Are Such a Big Part of Pipefitting
Pipefitters have been fabricating tools for generations.
Not because commercially manufactured tools aren’t useful.
Because field problems don’t always wait for somebody to manufacture the perfect solution.
A fitter sees a problem.
Looks at what’s available.
Thinks about how the force needs to move.
Then says:
“I can make something for that.”
That’s how the trade ended up with dogs, doghouses, wedges, spacers, push-pulls, modified clamps, flange tools, layout aids, and countless other little shop-fabricated devices.
Some are crude.
Some are incredibly clever.
Some look like they were welded together during lunch thirty years ago and somehow still work perfectly.
The culture of solving problems with what you have is one of the things that makes the industrial trades unique.
Safety Considerations for Shop-Fabricated Tools
Homemade doesn’t automatically mean unsafe.
But homemade doesn’t mean indestructible either.
Before using a shop-fabricated flange wrench, inspect the handle, pins, welds, and overall condition.
Never use a visibly cracked, badly bent, severely corroded, or otherwise damaged tool.
Don’t use it for lifting.
Don’t use it as a rigging attachment.
Don’t strike it unless the tool and procedure specifically permit that use.
Don’t add extreme cheater-bar leverage to something that wasn’t designed for it.
Don’t assume a wrench fabricated for one flange pattern is appropriate for another.
Most importantly, follow your employer’s rules regarding homemade and shop-fabricated tools. Some contractors and facilities restrict their use or require inspection and approval before they’re placed into service.
The fact that somebody has used a particular homemade tool for twenty years doesn’t override your employer’s tool-safety requirements.
The Tool Is Simple. Making It Right Still Matters.
That’s what makes this little flange wrench such a good example of pipefitter ingenuity.
There isn’t much to it.
A handle.
Two pins.
Two flange holes.
Leverage.
You could explain the entire concept to another fitter in thirty seconds.
But making a good one still requires the same habits that separate good fabrication from bad fabrication.
Measure accurately.
Think about where the force is going.
Keep the pins aligned.
Tack first.
Test-fit.
Control distortion.
Make sound welds.
Inspect the finished tool.
And mark the damn thing so the next fitter knows what it fits.
Final Takeaway
A homemade two-pin flange wrench is one of those tools that perfectly represents old-school pipefitting.
You don’t need twenty moving parts.
You don’t need electronics.
You don’t need an instruction manual.
You need a properly fabricated handle with two correctly positioned pins that engage the flange bolt holes and provide controlled leverage for turning a threaded flange.
That’s it.
Simple tools survive because they solve simple problems extremely well.
And there’s something satisfying about reaching into the gang box, grabbing a tool somebody fabricated years ago, slipping those two pins into a flange, and realizing:
Whoever made this knew exactly what problem needed solving.


