A speed square is one of those tools that almost everyone recognizes, but surprisingly few people use to its full potential. Carpenters made it famous, but its usefulness goes far beyond framing lumber. Fabricators, welders, pipefitters, ironworkers, millwrights, maintenance mechanics, and industrial tradesmen can find plenty of reasons to keep one nearby.
At first glance, it looks like a simple triangular square. Look closer and you have a 90-degree square, 45-degree square, angle finder, layout guide, straightedge, marking guide, saw guide, and quick reference tool packed into something small enough to hang from a tool belt.
Here are 10 useful things you can do with a speed square that you might not be using it for.
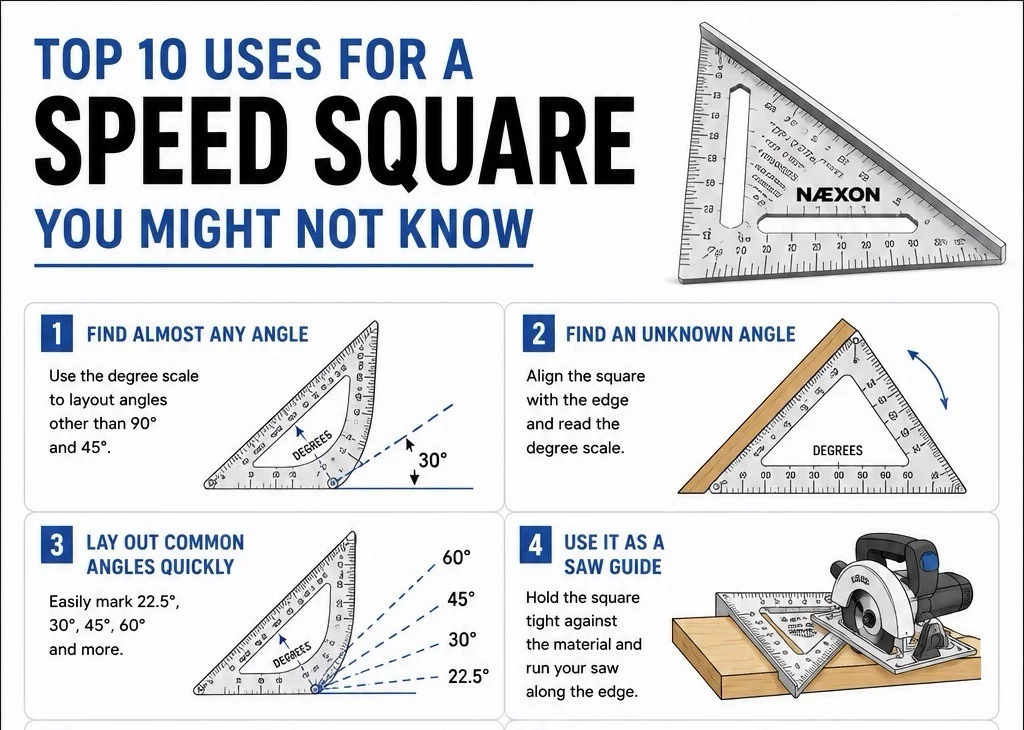
1. Find Almost Any Angle Without a Protractor
Most people use a speed square for 90° and 45° lines, but the degree scale along the curved edge allows it to lay out many other angles.
Place the square’s pivot point against the edge of your material. Hold the pivot in position and rotate the square until the desired degree marking lines up with the edge.
If you need 30°, rotate until 30 lines up.
Need 22.5°? Rotate to 22.5°.
Need 60°? Set it accordingly.
You now have a reference edge for marking the angle.
This can be especially useful during fabrication when you need to quickly visualize an angle before making a more precise layout.
2. Find an Unknown Angle
The same degree scale can work in reverse.
Instead of using the square to create an angle, use it to estimate or determine an existing angle.
Place the pivot against the corner where the angle begins and rotate the square until one edge aligns with the existing surface or reference line. Read the degree scale where the material edge intersects it.
This is useful when reproducing an existing bracket, support, brace, piece of framing, or fabricated component.
Rather than guessing that something is “around 30 degrees,” you have a quick measurement you can work from.
3. Lay Out 22.5°, 30°, 45°, and 60° Cuts Quickly
Industrial fabrication frequently involves angles other than 90 degrees.
Suppose you need to mark a brace at 30°. Instead of pulling out a combination square, bevel gauge, and protractor, the speed square can often establish the angle immediately.
The same principle works for common angles such as:
22.5° — 30° — 45° — 60°
That makes the tool useful for supports, brackets, structural pieces, temporary fabrication, framing, and general layout work.
For critical fabrication, verify the finished layout with the appropriate precision measuring equipment. A speed square is excellent for fast layout, but it is not a replacement for calibrated precision tools when tolerances are tight.
4. Use It as a Quick Saw Guide
This is one of the simplest speed-square tricks and one of the most useful.
After marking a cut, hold the square firmly against the edge of the material and use its straight edge as a guide for a circular saw.
Instead of trying to visually follow a pencil line, the saw shoe can ride along the square.
The result is usually a much straighter cut.
The same idea can sometimes be adapted when working with other cutting tools, provided the square can be safely positioned away from the blade or cutting wheel.
The important word is safely. Never place your hand or the square where a cutting tool could catch it.
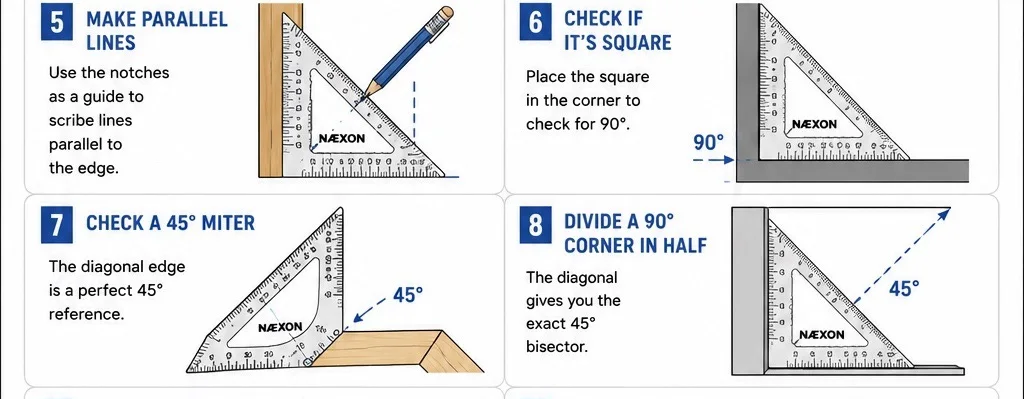
5. Make Parallel Lines Using the Notches
Many speed squares contain small notches or scribe marks along one section of the tool.
Those little marks aren’t decoration.
They allow you to create a line parallel to the edge of your material.
Place a pencil, soapstone, or appropriate marking tool in the desired notch. Keep the speed square’s fence firmly against the edge and slide the square along the material.
The marking point follows the square and produces a consistent line.
For example, if you need a line approximately one inch from the edge of a board or plate, you can use the corresponding reference and slide the square along the edge.
This can be surprisingly useful for repetitive layout.
6. Check Whether Something Is Square
This is obvious once you think about it, but many people forget how useful the thick fence on a speed square can be.
Place the fence against one surface and bring the 90-degree edge against the adjoining surface.
If both surfaces contact the square correctly, you have a quick indication that the pieces are approximately 90 degrees to each other.
In industrial work, this can help during preliminary layout of brackets, supports, small frames, equipment bases, fabricated assemblies, and temporary fixtures.
For precision alignment or larger assemblies, use the appropriate level, machinist square, laser, measurements, or surveying equipment.
But when you simply need to know, “Is this thing square?”, the speed square gives you an answer in seconds.
7. Check a 45° Miter
The triangular shape gives you another built-in reference that is extremely useful around fabrication.
The diagonal edge establishes 45 degrees.
That means you can quickly check or mark a 45° miter without calculating the angle.
Place the appropriate edges of the square against the material and use the diagonal side as your 45-degree reference.
For welders and fabricators, this can be useful when laying out small brackets, frames, supports, tubing, angle iron, and other components.
It is also an excellent quick visual check before committing to a cut.
8. Divide a 90° Corner in Half
Need the exact halfway direction between two perpendicular surfaces?
That’s 45 degrees.
Because a speed square already provides both the 90° relationship and its 45° diagonal, it can quickly establish the bisector of a square corner.
This becomes useful when locating diagonal braces, gussets, supports, center references, and symmetrical layouts.
The same concept also helps when trying to visualize geometry in the field.
Instead of doing the math mentally, the tool physically shows you the relationship:
90° ÷ 2 = 45°
Simple, but extremely useful.
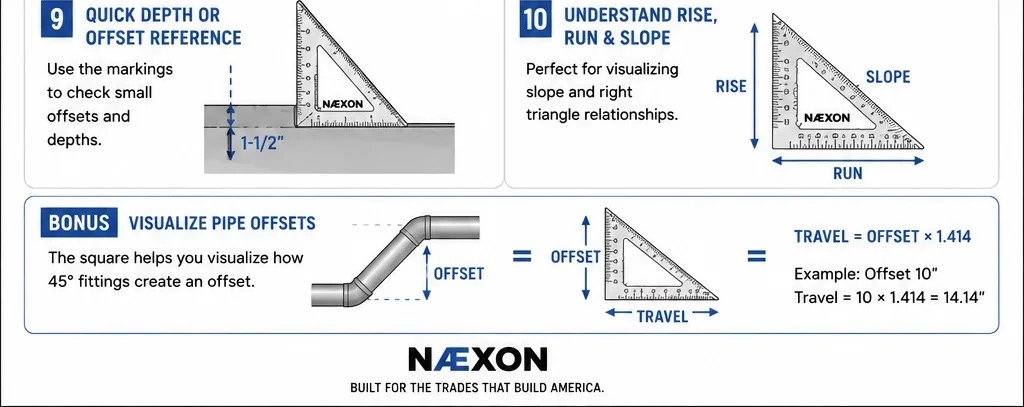
9. Use It as a Quick Depth or Offset Reference
The straight edges and dimensional markings on many speed squares make them useful for checking small distances, offsets, and depths.
For example, you may need to determine how far a bracket sits from an edge or compare the position of two components.
Place one side of the square against a reliable reference surface and use the graduations to estimate the difference.
It isn’t a replacement for a tape measure, combination square, depth gauge, or precision measuring instrument, but for quick field checks it can save time.
This is especially useful when you’re repeatedly checking the same approximate offset.
Once you establish the reference, the square can become a simple go/no-go comparison tool.
10. Use It to Understand Rise, Run, and Slope
This is where the speed square becomes more interesting.
The tool isn’t only about angles.
It can also help visualize rise and run.
Rise is vertical movement.
Run is horizontal movement.
Those two measurements create a slope.
Carpenters use this constantly for rafters and roof pitches, but the geometry applies far beyond roofing.
Industrial tradesmen encounter the same fundamental relationship when dealing with sloped supports, structural braces, drainage, equipment layouts, ramps, and other angled installations.
If something moves horizontally while simultaneously changing elevation, you are dealing with a triangle.
Once you start thinking about the speed square as a triangle calculator and layout tool, rather than simply a carpenter’s square, its usefulness becomes much greater.
Bonus: Use It to Visualize Pipe Offsets
A speed square won’t calculate every pipe offset for you, but it can be an excellent visual aid.
Suppose you’re trying to explain why two 45° fittings create an offset.
Lay the speed square against your reference.
The horizontal side represents one direction.
The vertical side represents another.
The diagonal represents the travel.
You are essentially looking at the same right-triangle relationship used in pipefitting calculations.
For a simple 45° offset:
Travel = Offset × 1.414
If the offset is 10 inches:
10 × 1.414 = 14.14 inches
The speed square makes that geometry easier to visualize because the triangle is physically sitting in your hand.
This same thinking connects directly with the principles used when calculating 45-degree pipe runs, rolling offsets, pipe layout, and piping isometric drawings.
The Speed Square Isn’t Just a Carpenter’s Tool
That’s probably the biggest misconception about the speed square.
Yes, it was designed around carpentry and framing.
But geometry doesn’t care what trade you’re in.
A 45-degree angle is still 45 degrees whether you’re cutting a rafter, fabricating a steel bracket, laying out a support, checking a frame, or trying to visualize an offset.
For industrial tradesmen, the biggest advantage is speed.
You can grab one small tool and immediately establish a 90°, find a 45°, lay out another angle, check a corner, mark a parallel line, estimate an existing angle, guide a cut, or visualize a triangle.
Once you understand everything built into it, the speed square starts looking less like a simple triangle and more like a compact layout system.
And for a tool that can disappear into a toolbox or back pocket, that’s a lot of capability.
Næxon Learning Center — Built for the trades that build America.


