There is a common pipefitting problem that looks simple until the tape measure comes out: the drawing calls for two 90-degree elbows at a specific center-to-center dimension, but two standard elbows are already longer than the space available.
At that point, there is no normal pup length to calculate. The number comes out negative.
That does not mean you should automatically start cutting elbows. It means the fitting arrangement needs to be checked before fabrication continues.
Start With the Center-to-Center Formula
For two 90-degree elbows facing each other, the basic calculation is:
Pup length = Center-to-center − Takeoff of first 90 − Takeoff of second 90
If both elbows are identical:
Pup length = C-C − (2 × elbow takeoff)
Suppose the required center-to-center dimension is 20 inches and each elbow has a 12-inch center-to-end dimension.
The calculation becomes:
20 − 12 − 12 = −4 inches
That negative number is the important part.
It means the two standard elbows require 24 inches of center-to-center space, while the drawing gives you only 20 inches. You are 4 inches short.
There is no pup that can solve that problem.
Before working problems like this, it helps to understand fitting takeoff, centerline dimensions, and how dimensions are shown on piping drawings. These concepts work directly with the principles covered throughout the Næxon Learning Center, including isometric drawing and pipefitter-math lessons.
Can You Split the Shortage Between Both Elbows?
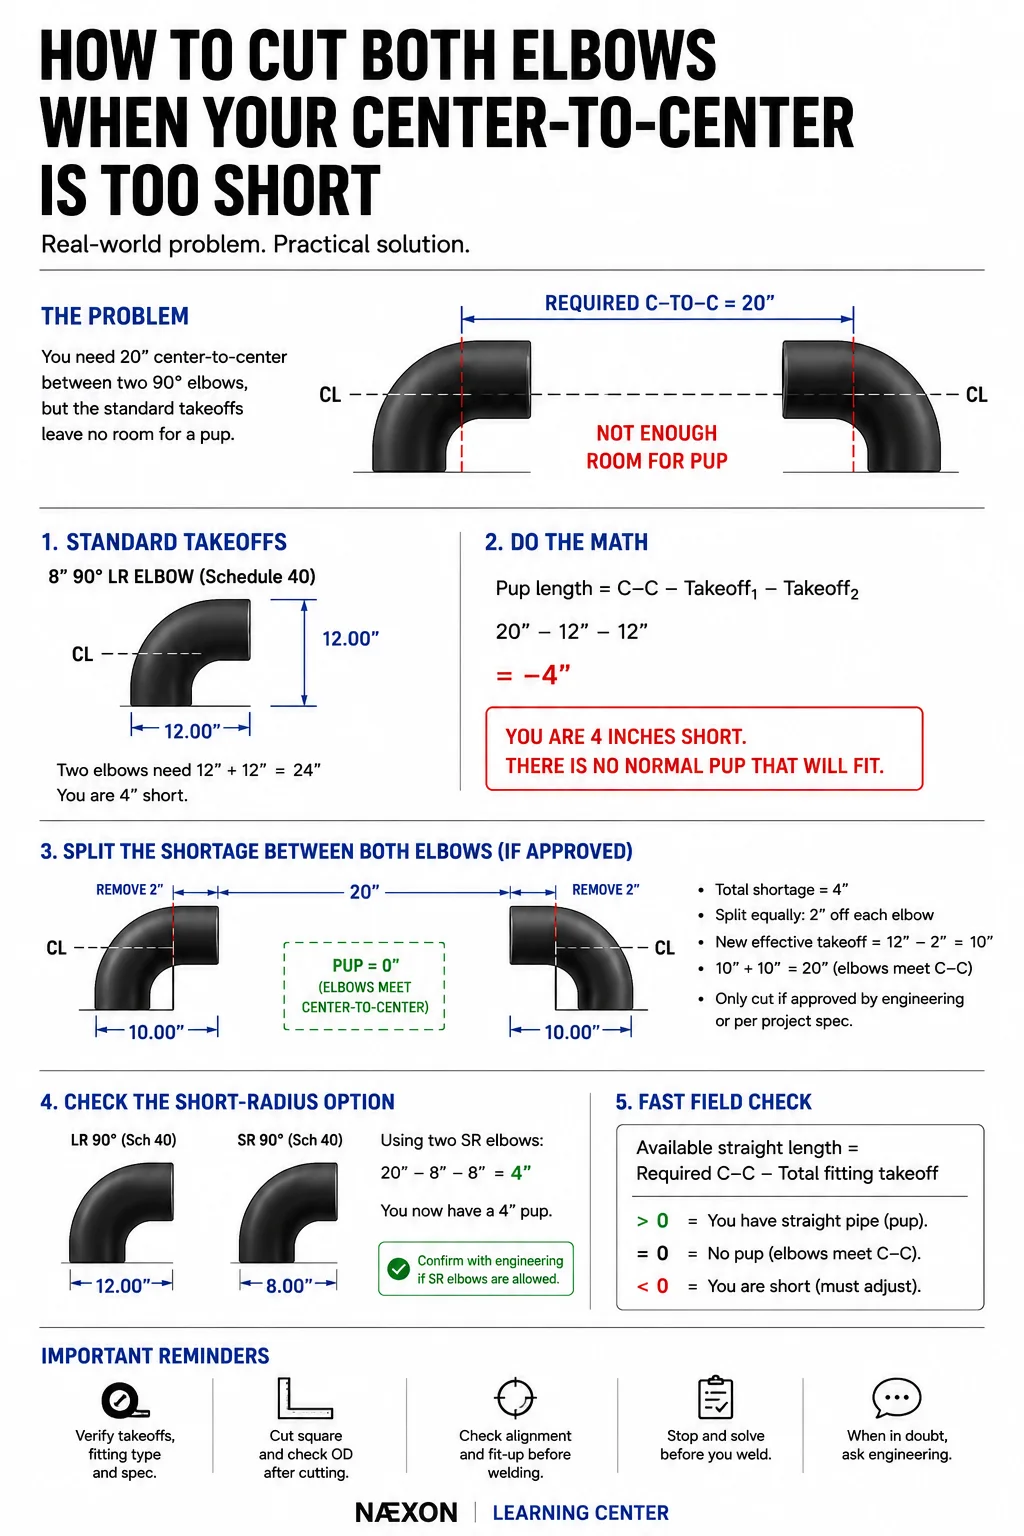
From a purely dimensional standpoint, yes.
If the total interference is 4 inches and you wanted to distribute the dimensional reduction equally:
4 ÷ 2 = 2 inches per elbow
The proposed effective center-to-end dimension would become:
12 − 2 = 10 inches
Then:
10 + 10 = 20 inches
On paper, the geometry works perfectly.
But that calculation only tells you how much dimensional reduction would be required. It does not tell you whether cutting 2 inches from each elbow is acceptable.
That distinction matters.
Why You Cannot Treat an Elbow Like Straight Pipe
A butt-weld elbow is not simply a curved piece of straight pipe with unlimited material available at each end.
Its manufactured weld ends are designed to provide the specified outside diameter, wall characteristics, roundness and weld preparation required to connect with the adjoining pipe.
As you move farther into the bend, the geometry changes.
Cutting deeply into a standard elbow can therefore leave a new end that does not behave like the original factory weld end. Depending on the fitting and how much material is removed, you may encounter out-of-round conditions, wall-thickness differences, poor alignment, excessive internal mismatch or difficulty producing the required bevel and root opening.
That is why the statement “we only need to take two inches off each one” is not enough justification by itself.
The tape measure solves the dimensional problem. The piping specification determines whether the solution is acceptable.
First Check Whether the Fitting Has Tangent
Not every elbow or bend is manufactured exactly the same way.
Some bends are supplied with straight tangent material extending beyond the curved portion. If sufficient straight tangent exists, an approved fabrication procedure may allow some of that material to be removed without cutting into the actual bend.
That is very different from taking a standard elbow and cutting deeply into its curved body.
Before cutting anything, identify where the tangent ends and where the bend begins.
If you are already cutting into the curved portion to obtain your required dimension, additional considerations become much more important.
Check the Short-Radius Option
There is another solution that should be considered before modifying long-radius elbows.
For nominal pipe size NPS 8, a standard long-radius 90-degree elbow has a nominal center-to-end dimension of approximately:
12 inches
A short-radius 90 has a nominal center-to-end dimension of approximately:
8 inches
Now run the same 20-inch center-to-center problem using two short-radius elbows:
20 − 8 − 8 = 4 inches
Instead of being 4 inches too short, you now have room for approximately a 4-inch pup between the fittings.
Dimensionally, that is a much cleaner arrangement.
But you cannot simply substitute short-radius elbows because they fit.
The line specification, engineering requirements, service conditions, pressure-drop considerations and project standards determine whether short-radius fittings are permitted. Some systems specifically require long-radius elbows.
The fitter’s job is to recognize the possible solution—not to change the engineered fitting specification without authorization.
What If Long-Radius Elbows Are Required?
Now the problem becomes more interesting.
You have confirmed that the drawing requires 20 inches center-to-center. You have confirmed that the fittings are long-radius 90s. You have confirmed their dimensions. Two standard fittings will not fit.
That is exactly when the discrepancy should be raised.
Depending on the system, engineering or fabrication may approve a different bend radius, fabricated fitting, revised routing, specially manufactured fitting, dimensional revision, or controlled modification of the existing fittings.
On noncritical fabrication, there may be considerably more flexibility. On refinery, chemical, power-generation and other process piping, the applicable piping specification and code requirements control what modifications are acceptable.
Catching that issue before welding is part of being a good fitter.
What If Cutting the Elbows Is Approved?
If the project’s engineering, QC or approved fabrication procedure allows the fittings to be cut back, then you can return to the original calculation.
Suppose the two elbows together must lose 4 inches of effective takeoff and the reduction is to be divided equally.
The target reduction is:
2 inches per fitting
But do not simply measure 2 inches from each factory end, cut them, bevel them and assume the spool is correct.
The required cut plane must be established properly. After cutting, the new end should be checked for squareness, outside diameter, roundness, wall condition and internal alignment with the mating pipe. The new weld preparation must also meet the project’s requirements.
The mating pipe should be fitted and the entire assembly checked before final welding.
This is where proper layout tools matter. A quality Næxon Torpedo Level can be used during alignment and reference-plane checks, while Næxon Two-Hole Push Pins are useful when flange orientation and bolt-hole clocking are part of the same spool.
Do Not Forget About the Pup
There is another version of this problem.
Sometimes the two standard elbows technically fit inside the required center-to-center dimension, but the remaining pup is so short that fabrication becomes impractical.
For example, imagine your calculation leaves only a tiny section of straight pipe between two butt-weld fittings.
Mathematically, it fits.
Practically, you now have two weld joints extremely close together.
That can create fabrication, welding, inspection and heat-input concerns depending on the applicable specification.
So there are really two questions every fitter should ask:
Will the fittings physically fit?
And:
Is the resulting fabrication actually permitted?
Those are not always the same question.
The Fast Field Check
Whenever two fittings look suspiciously close together, do this calculation before cutting pipe:
Available straight length = Required C-C − Total fitting takeoff
There are only three possible results.
A positive number means you have straight pipe between the fittings.
Zero means the fitting takeoffs consume the entire center-to-center dimension.
A negative number means the standard fittings overlap dimensionally.
That negative number is your warning.
For our example:
20 − 24 = −4 inches
You immediately know something must change.
Why Experienced Fitters Check This Before Cutting
A lot of fabrication mistakes happen because somebody sees a dimension on an isometric and immediately starts cutting pipe.
Experienced fitters usually work backward first.
They identify the fittings, verify the center-to-end dimensions, subtract the takeoffs and determine what physical space remains.
That ten-second calculation can expose an impossible spool before any material gets ruined.
The same habit applies to rolling offsets, flange-to-flange spools, valve assemblies, reducers and tight equipment connections. Understanding the relationship between centerline dimensions and actual fitting dimensions is one of the foundations of industrial pipe layout.
Continue building that foundation with Næxon’s How to Read Isometric Drawings lessons, Pipefitter Math material, Flange Bolt-Hole Rotation and Clocking guide and other technical lessons throughout the Næxon Learning Center.
When the number comes out negative, don’t force the spool to fit.
Stop. Verify the takeoffs. Verify the fitting type. Check the specification. Then determine the approved way to gain the missing space.
That is the difference between making the numbers work on a tape measure and making the piping system work in the field.


