Næxon Learning Center | Rigging & Crane Fundamentals
On a noisy industrial jobsite, a crane operator may be hundreds of feet from the person controlling the movement of the load.
Engines are running.
Equipment is moving.
Workers are communicating over radios.
Structures, pipe racks, vessels, and other equipment may partially block the operator’s view.
Yet the operator still needs clear instructions:
Hoist.
Lower.
Boom up.
Boom down.
Swing.
Stop.
That is why standardized crane hand signals are such an important part of lifting operations.
A signal person isn’t simply waving at the operator.
Every deliberate movement communicates a specific command.
The operator must recognize it.
The signal person must give it clearly.
And the lifting crew needs to understand who is directing the crane.
When communication becomes unclear, crane movement should not become guesswork.
Why Crane Hand Signals Matter
A crane lift depends on communication.
The operator controls the machine, but the operator may not always have a clear view of:
- the load
- landing area
- rigging
- obstructions
- workers near the load
- clearances
- final placement point
The signal person becomes another set of eyes for the operator.
That creates a critical communication chain:
Rigger / Signal Person → Crane Operator → Crane Movement → Load
If the signal is misunderstood, the crane can move differently than intended.
Even a small unintended movement can matter when a heavy load is close to:
- workers
- structural steel
- piping
- equipment
- power lines
- vessels
- scaffolding
- other obstructions
Hand signals provide a common visual language for controlling those movements.
Standard Signals vs. Jobsite Gestures
There is an important difference between a recognized crane hand signal and an improvised gesture.
Pointing vaguely upward is not the same thing as giving a clear hoist signal.
Waving toward yourself is not automatically a recognized command.
A signal person should use the standardized signals applicable to the crane and operation.
The exact requirements depend on the equipment, jurisdiction, employer procedures, and applicable regulations.
This lesson teaches the fundamental signal concepts, but actual lifting operations must follow the signals and requirements applicable to the crane being operated.
One Signal Person
One of the most important communication principles is controlling who is giving the operator directions.
Imagine three workers standing near a suspended pipe spool.
One person signals:
Swing left.
Another starts motioning:
Boom down.
A third waves because they want the operator’s attention.
From the cab, the operator sees several people moving their arms.
That is not controlled communication.
The designated signal person should be clearly identifiable to the operator.
The crew should know who has that responsibility.
However, there is one major exception:
An emergency stop signal should be obeyed regardless of who gives it.
Safety takes priority over the normal communication chain.
Signal 1 — Stop
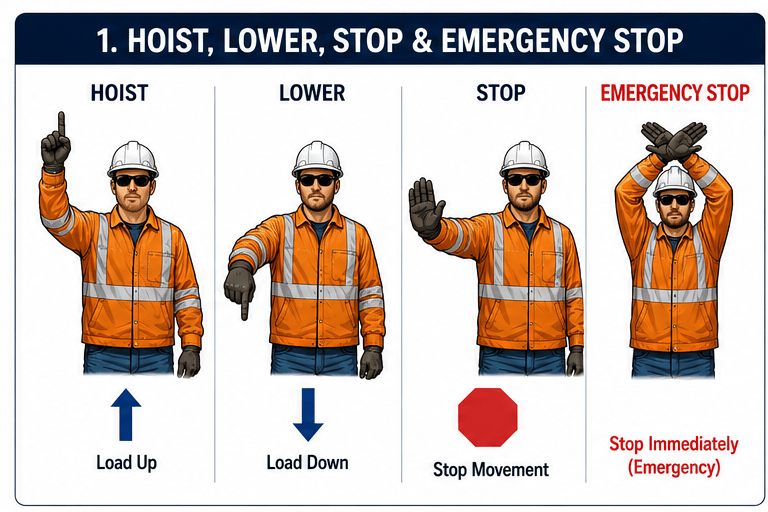
The STOP signal tells the operator to stop the crane movement being performed.
The signal is deliberate and unmistakable.
This is one of the most important commands on the job.
The operator should never have to wonder whether the signal person meant:
“Slow down.”
“Keep going.”
or:
“Stop.”
A good signal person makes every signal clean and intentional.
Signal 2 — Emergency Stop
Emergency stop is different from a normal stop.
It communicates:
Stop crane movement immediately.
This signal may be necessary if someone sees:
- a worker entering the danger area
- rigging failure
- unexpected load movement
- an obstruction
- equipment instability
- another immediate hazard
The critical principle is:
Emergency stop overrides normal signaling authority.
If someone recognizes an immediate dangerous condition and gives the recognized emergency-stop signal, the operator should respond according to the applicable requirements and procedures.
Signal 3 — Hoist
The HOIST signal commands the operator to raise the hook or load.
Think:
Load goes UP.
This is one of the most frequently used signals in crane operations.
The signal person should maintain visual contact with the operator whenever required and continue communicating clearly throughout the movement.
A common field mistake is stopping the signal too early.
If continuous signaling is required for the operation, the signal should remain clear until the intended movement is complete or another signal is given.
Signal 4 — Lower
The LOWER signal tells the operator to lower the hook or suspended load.
Think:
Load goes DOWN.
Lowering a load into its final position often requires extremely controlled communication.
A 20,000-pound piece may need to move only:
1 inch
or:
1/2 inch
to line up with a connection.
This is where signal quality becomes especially important.
The operator cannot see what is inside the signal person’s head.
The signal needs to communicate the movement clearly.
Signal 5 — Swing
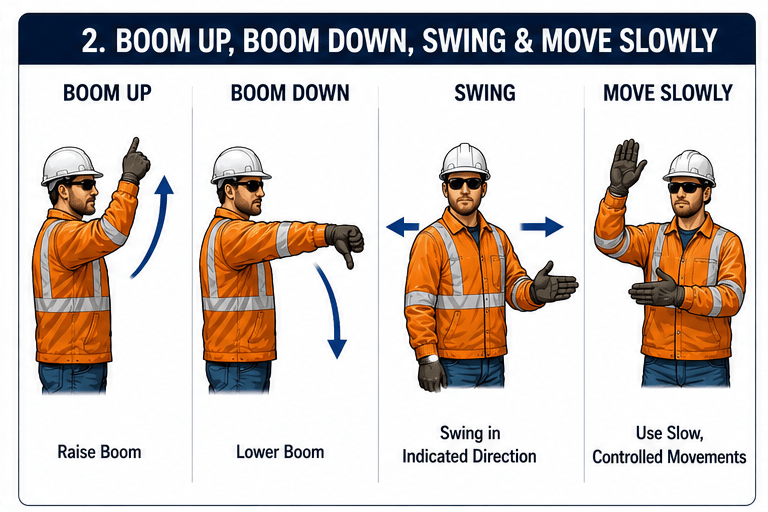
The SWING signal directs the crane to rotate in the indicated direction.
The signal person indicates where the boom should swing.
Swinging changes the load’s position around the crane.
Depending on the crane and lift, swinging may also move the load through different:
- lifting quadrants
- clearances
- site conditions
- operating areas
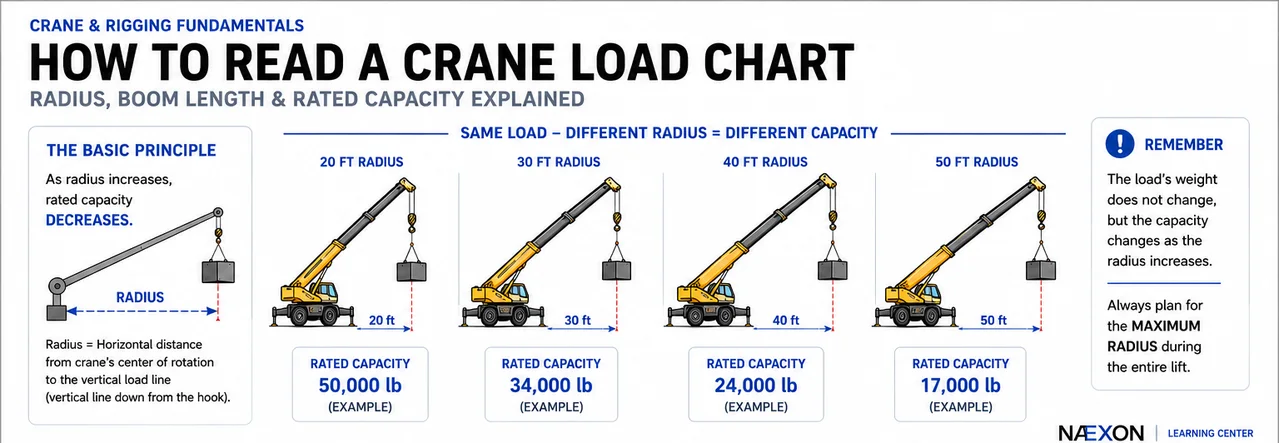
As discussed in the Næxon Learning Center lesson on reading crane load charts, crane capacity can depend on configuration, radius, and operating area.
That means a swing isn’t merely horizontal movement.
It can change the conditions of the lift.
Signal 6 — Boom Up
BOOM UP tells the operator to raise the boom.
Do not confuse this with hoist.
They can both make the load move upward, but they accomplish it differently.
Hoist:
moves the hook using the hoist line.
Boom up:
changes the boom angle.
That difference matters because changing boom angle can also change the load radius.
And as covered in our Næxon crane load-chart training, radius directly affects available crane capacity.
Signal 7 — Boom Down
BOOM DOWN tells the operator to lower the boom angle.
Again, this is different from lowering the hook.
Booming down can move the hook:
outward
and potentially:
downward
depending on crane geometry and other simultaneous movements.
Most importantly, booming down can increase load radius.
That means the crane may have less available capacity after booming down than it did before the movement.
This is why crane hand signals cannot be separated from basic load-chart knowledge.
The signal person should understand what the commanded movement actually does to the lift.
HOIST vs. BOOM UP
This distinction deserves special attention.
HOIST
The boom stays in essentially the same position.
The hoist line moves.
The hook travels upward.
BOOM UP
The boom angle increases.
The boom tip changes position.
The hook’s position and radius can change.
The load may rise, but the crane geometry also changes.
A signal person who confuses these two commands can tell the operator to perform a completely different crane movement than intended.
LOWER vs. BOOM DOWN
The same distinction exists in the opposite direction.
LOWER
The hoist line pays out.
The hook travels downward.
BOOM DOWN
The boom angle decreases.
The hook may travel outward as the working radius increases.
Those movements are not interchangeable.
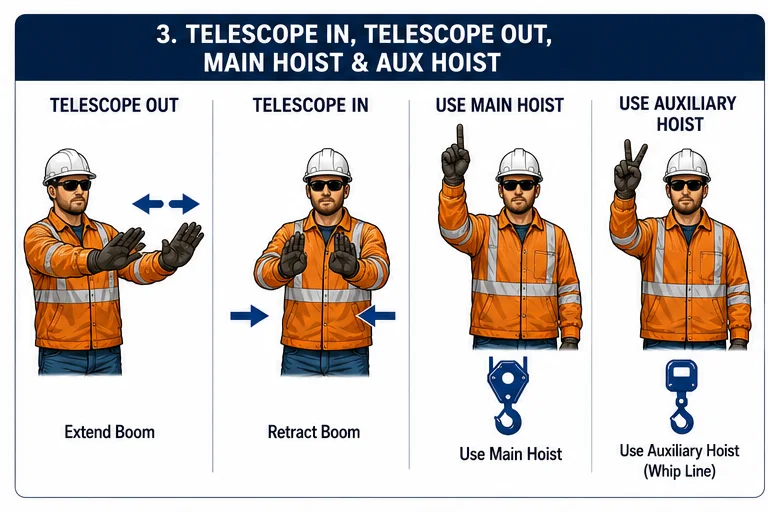
Signal 8 — Telescope Out
On a telescopic-boom crane, TELESCOPE OUT commands the operator to extend the boom.
Extending the boom changes crane geometry.
Depending on the configuration, it can affect:
- boom length
- radius
- hook position
- chart capacity
A signal person should never think of telescoping as simply “make the boom longer.”
It changes the crane’s operating condition.
Signal 9 — Telescope In
TELESCOPE IN tells the operator to retract the telescopic boom.
Again, this changes the crane’s geometry.
Depending on other movements, retracting can bring the boom tip and hook closer to the crane.
The exact resulting hook path depends on the crane and whether other functions are being performed simultaneously.
Signal 10 — Move Slowly
Sometimes the correct direction is obvious but the speed needs to change.
This is where the MOVE SLOWLY signal becomes important.
Industrial lifting often transitions from large movements to extremely small movements.
For example:
A pipe spool may travel:
40 feet through open space
and then require:
1/4-inch adjustments
during final fit-up.
The movement command may still be:
lower
but now the crew needs:
lower slowly.
The signal person communicates both the function and the need for controlled movement.
Signal 11 — Use Main Hoist
Cranes may have more than one hoisting system.
The operator may need to know whether the signal refers to the:
main hoist
or another hoist such as an auxiliary/whip line, depending on the crane.
The recognized signal identifies which system should respond.
This becomes especially important when multiple hooks or lines are present.
Signal 12 — Use Auxiliary Hoist / Whip Line
The signal person may need to specify that the auxiliary hoist is being controlled.
This prevents confusion when more than one hook is visible or available.
The principle is simple:
Identify the function before commanding its movement.
Signal 13 — Travel
Mobile or crawler cranes may need to travel while operating under conditions permitted by the manufacturer and lift plan.
Travel signals direct machine movement rather than simply boom or hook movement.
Traveling with a crane introduces another set of considerations, including:
- ground conditions
- slope
- load position
- boom position
- crane configuration
- manufacturer limitations
- route conditions
Never assume that because a crane can pick a load, it can automatically travel with it.
The applicable crane requirements control.
Signal 14 — Dog Everything / Secure All Functions
A recognized DOG EVERYTHING type signal tells the operator to stop movement and secure crane functions as applicable.
This is different from simply completing one movement.
It communicates that crane motions should be held.
Understanding the terminology used for the specific equipment and worksite is important.
Signal 15 — Multiple Crane Functions
Some operations may require coordinated crane functions.
For example, the operator may need to:
hoist while booming
or perform another permitted combination.
These movements require especially clear communication.
The signal person should use the recognized method required for simultaneous functions and should never improvise a combination that the operator cannot confidently interpret.
Complex movement increases the importance of standardized communication.
Hand Signals and Load Radius
A good signal person understands that certain hand signals change crane radius.
Consider:
Boom down
Radius can increase.
Boom up
Radius can decrease.
Telescope out
Radius may increase depending on geometry.
Telescope in
Radius may decrease depending on geometry.
Swing
The load moves around the crane and may enter a different lifting quadrant.
This connects directly to the Næxon Learning Center’s crane load-chart lesson: Radius, Boom Length & Rated Capacity Explained.
The person directing the crane should understand not only what the machine will do—but how that movement affects the lift.
Hand Signals and Rigging Geometry
The signal person also needs awareness of what is happening below the hook.
A load may be properly rigged while stationary but behave differently when it begins moving.
Watch for:
- load rotation
- shifting center of gravity
- sling movement
- changing sling angles
- snagged rigging
- tag-line behavior
- load interference
- unexpected tilt
The Næxon Learning Center lesson on determining a load’s center of gravity explains why the hook needs to be positioned correctly relative to the load’s balance point.
Our training on sling angles also explains why changing rigging geometry can change sling tension.
Hand signaling is therefore part of a larger rigging system.
Before Giving the Hoist Signal
A good signal person doesn’t automatically give the hoist signal simply because the operator is ready.
Before the load comes up, verify according to the lift plan and site requirements that conditions are ready.
Questions may include:
Is the rigging properly connected?
Are shackles correctly installed?
Are slings positioned as intended?
Is the hook positioned correctly?
Is the load free to move?
Are workers clear?
Are tag lines arranged as required?
Is the travel path clear?
Is there anything still attached to the load?
Is the signal person visible to the operator?
Is communication established?
A crane should not discover that the load is still bolted down by trying to lift it.
The Initial Tension-Up
One of the most informative moments in a lift occurs before the load fully leaves its support.
The operator slowly takes tension.
The rigging begins to load.
This gives the crew an opportunity to observe:
- sling seating
- shackle position
- hook position
- load balance
- unexpected movement
- interference
- rigging alignment
If something does not look correct, stop and correct it before continuing.
The first few inches can tell you a lot.
Test Lift
Where required by the lift plan or procedure, the load may initially be raised a small distance so the crew can verify control and balance before continuing.
During this stage, observe:
Is the load level as expected?
Is the center of gravity behaving as expected?
Are the slings staying seated?
Is anything shifting?
Is the crane stable and operating as planned?
The objective is not to hurry the load into the air.
It is to establish control.
When the Operator Cannot See the Signal Person
Visual signaling only works when the operator can see and understand the signal.
If the signal person disappears behind:
- equipment
- structure
- vessel
- pipe rack
- building
- load
the communication method must follow the applicable procedure.
This may require:
- radio communication
- another qualified signal person
- controlled signal transfer
- repositioning
Do not continue giving invisible hand signals and assume the operator knows what you mean.
Radio Communication
Hand signals and radios often work together.
Radio communication should be:
clear
brief
specific
and understood by both parties.
Avoid unnecessary conversation during critical crane movement.
Commands should identify the movement required using terminology understood by the operator and signal person.
If communication is lost, crane movement should follow the applicable stop/communication-loss procedure rather than continuing on assumptions.
Signal Transfer
Some lifts pass behind structures where one signal person cannot maintain continuous visibility.
A controlled transfer between qualified signal persons may be necessary under the applicable procedure.
The operator needs to know exactly:
Who currently has control of signaling?
There should never be a moment when two people believe they are both directing the crane.
Keep Your Signals Big and Clean
A technically correct signal can still be poor communication if it is sloppy.
Avoid:
- tiny hand movements
- half-finished signals
- casual pointing
- talking with your hands between commands
- turning away mid-signal
- standing where the operator cannot see you clearly
The operator may be looking through:
- cab glass
- sunlight
- shadows
- rain
- dust
- structural obstructions
Make the signal deliberate enough to recognize.
Position Yourself Intelligently
A signal person needs a position that provides useful visibility without creating another hazard.
Ideally, the signal person should be able to observe the relevant:
load
path
landing area
and crane movement
while remaining visible to the operator when hand signals are being used.
Never place yourself underneath the suspended load simply to get a better view.
Never allow signaling responsibilities to pull you into a pinch point.
Communication matters.
So does your own position.
Don’t Walk Backward Into a Hazard
Signal persons often focus intensely on the suspended load.
That creates a common problem.
The signal person begins walking backward while watching the load.
Behind them may be:
- open holes
- material
- equipment
- piping
- curbs
- trenches
- other workers
Maintain situational awareness.
Controlling the load doesn’t help if the signal person walks into another hazard.
Watch the Load, Not Just the Operator
The operator needs to see you.
But you also need to understand what the load is doing.
Watch:
rigging
clearances
balance
load rotation
workers
landing point
boom/load path
Good signaling requires awareness of the entire operation.
When to Stop the Lift
If something doesn’t look right, stop.
Examples include:
- unexpected load shift
- sling movement
- rigging damage
- worker entering the area
- lost communication
- obstruction
- unexpected crane movement
- unstable landing area
- tag line problem
- unclear signal
- changing site condition
Stopping for clarification is better than continuing with uncertainty.
A suspended load is not the place to guess.
A Practical Lift Example
A pipe spool weighs:
16,000 lb
It needs to be lifted from grade and placed on an elevated pipe rack.
The signal sequence might conceptually involve:
1. Take tension slowly
The crew checks the rigging.
2. Hoist
Raise the spool clear of its support.
3. Stop
Verify balance and clearance.
4. Hoist
Gain required elevation.
5. Swing
Move the spool toward the rack.
6. Stop
Check alignment and clearance.
7. Boom / telescope as required by the approved lift plan
Position the load over the landing area.
8. Lower slowly
Bring the spool toward the supports.
9. Stop
Fitters verify position.
10. Lower in small controlled increments
Seat the spool.
The exact operation depends on the crane, lift plan, site, and conditions.
But notice the communication pattern:
Move → Stop → Verify → Move
Controlled lifting is not one continuous command.
A Better Crane-Signaling Workflow
1. Review the lift
Understand the load, rigging, crane configuration, path, and landing area.
2. Establish communication
The operator and signal person must understand the signaling method.
3. Identify the signal person
The operator should know who is directing normal movement.
4. Inspect the load area
Verify the path and surrounding conditions.
5. Rig the load
Follow the approved rigging plan and procedures.
6. Take tension slowly
Observe how the rigging and load respond.
7. Perform the initial lift
Verify balance and control.
8. Direct each movement clearly
Hoist, lower, swing, boom, telescope, travel, or stop as required.
9. Monitor continuously
Watch the load, rigging, clearances, crane, and workers.
10. Stop whenever uncertain
Do not convert confusion into movement.
11. Land the load under control
Final positioning often requires the smallest and most precise movements.
12. Release rigging only when appropriate
Confirm the load is properly supported and stable before unloading the rigging.
Common Crane Hand-Signal Mistakes
One common mistake is giving vague gestures instead of recognized signals.
Another is having multiple workers signal the operator simultaneously.
Another is confusing:
hoist with boom up
or:
lower with boom down.
Another is standing where the operator cannot clearly see the signal.
Another is continuing movement after visual or radio communication is lost.
Another is focusing entirely on the operator and failing to watch the load.
Another is signaling too quickly during final placement.
Another is failing to understand that boom and telescope movements can change radius and crane capacity.
And one of the biggest mistakes is continuing when the signal person isn’t sure what is happening.
Field Rule: If Communication Is Unclear, Stop
The operator should not have to interpret body language.
The signal person should not have to hope the operator understood.
A crane command should be unmistakable.
Clear signal.
Clear response.
Controlled movement.
If that chain breaks:
Stop.
Re-establish communication.
Then continue.
Knowledge Check
A signal person wants the suspended load to move straight upward while keeping the boom in essentially the same position.
Which crane function is being requested?
Answer:
HOIST
The hoist line raises the hook.
BOOM UP changes the boom angle and can also change the load radius.
Those are two different crane functions and therefore require different signals.
Practical Exercise
Imagine you are signaling a crane placing a large pipe spool.
The spool is approximately:
12 inches above its final supports.
The load is correctly positioned horizontally.
You want the operator to bring it down slowly without changing boom position.
Which instruction is required?
LOWER — SLOWLY
Not:
BOOM DOWN
Now imagine the spool begins rotating unexpectedly and one sling appears to be moving from its intended position.
What is the next command?
STOP.
Do not attempt to correct an uncertain rigging condition while continuing the movement.
Stop.
Evaluate.
Correct the problem according to the approved procedure.
Then resume when the lift is ready.
That is the central lesson of crane signaling:
Communicate → Move → Observe → Stop → Verify → Continue
The Rigger & Signal Person Standard
A good signal person does much more than memorize hand positions.
They understand what each command does to the crane.
They understand what it does to the load.
They understand the relationship between boom movement and radius.
They watch the rigging.
They watch the landing area.
They stay visible.
They communicate deliberately.
And when something doesn’t make sense, they stop the operation.
Crane hand signals are a language.
The operator and signal person need to speak that language the same way.
Because when thousands of pounds are suspended in the air, there is no room for:
“I thought you meant something else.”
Continue building those skills throughout the Næxon Learning Center with our training on crane load charts, sling-angle loading, center of gravity, rigging fundamentals, structural steel, pipefitting, and industrial field math.


