Guide: Pipe Saddle at 90°, 45° and 22.5°
A pipe saddle is different from a miter cut.
With a miter, two angled ends are joined together. With a saddle, the end of one pipe is shaped so it wraps around the outside of another round pipe.
This is also commonly called a fishmouth cut.
The goal is simple:
Cut the end of the branch pipe so it matches the curve of the main pipe at the angle you need.
For this guide, we’ll look at the same three finished angles:
90°, 45°, and 22.5°.
The easiest and most reliable method is to make or use a wraparound saddle template, transfer the shape onto the branch pipe, cut it, and then fine-tune the fit.
How to Cut a 90° Pipe Saddle
A 90° saddle is the easiest one to understand because the branch pipe meets the main pipe straight from the side.
Think of it like a T.
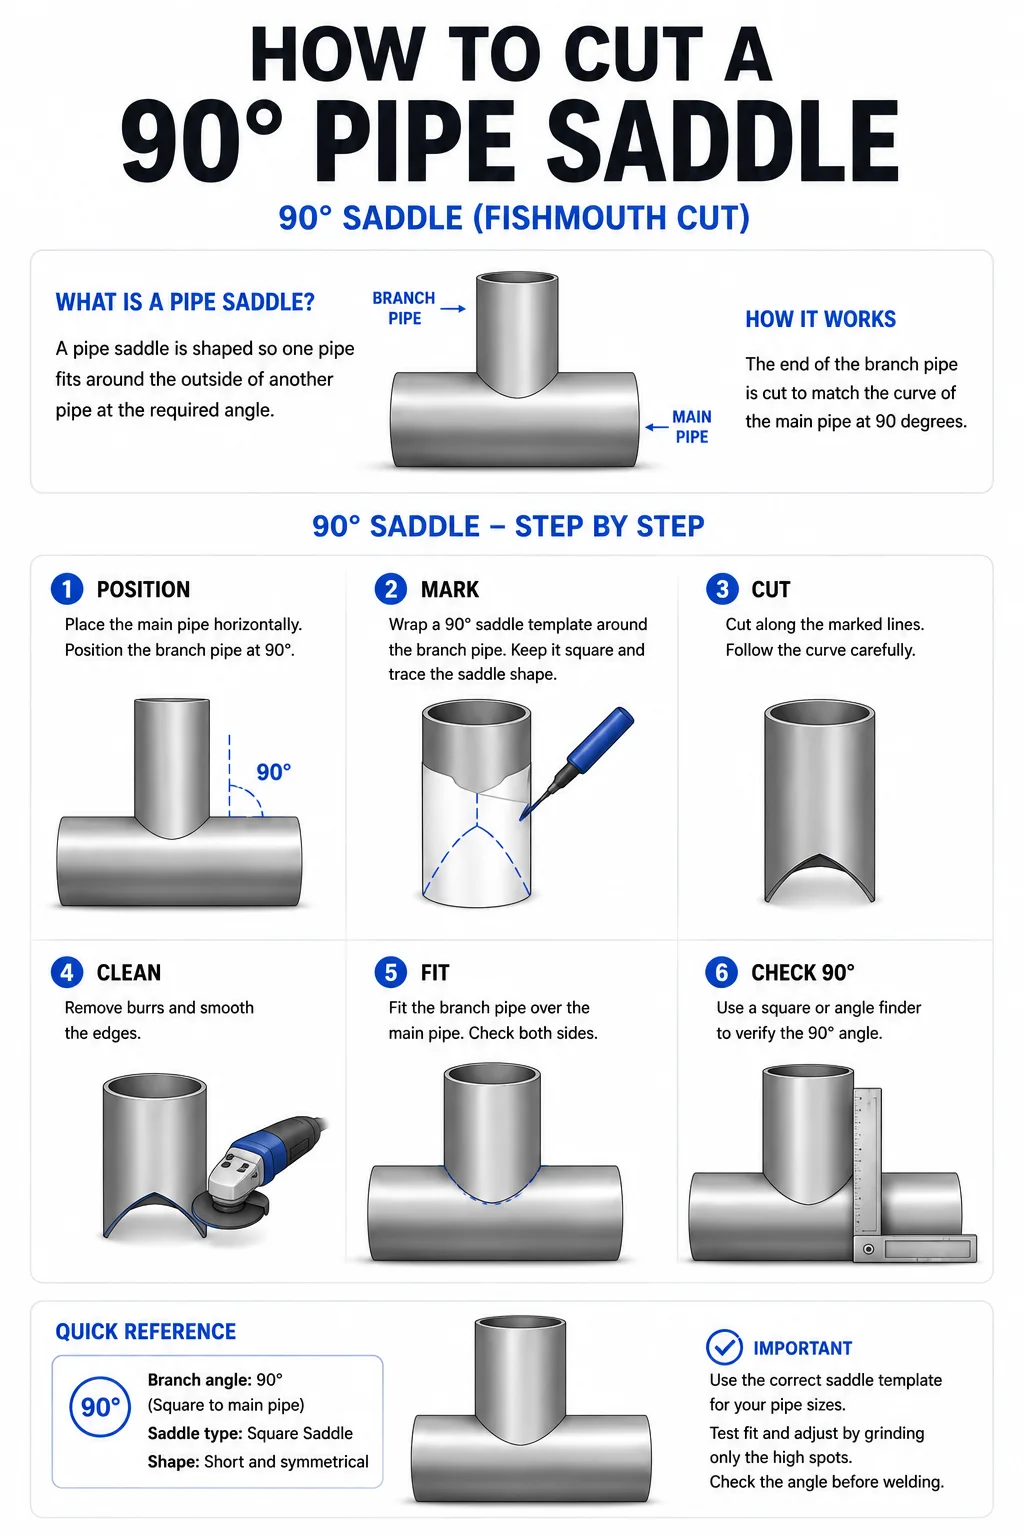
Step 1: Position the Pipes at 90°
Place the main pipe horizontally.
Position the branch pipe against it at 90°.
This shows you the final orientation you’re trying to create.
Step 2: Mark the Saddle
Wrap your 90° saddle template around the end of the branch pipe.
Keep the template square to the pipe and make sure both sides line up.
Trace the saddle shape with soapstone or a marker.
You should now see two curved sections on opposite sides of the pipe.
Step 3: Cut the Saddle
Cut along the marked lines.
Leave the line when possible rather than cutting too deeply into your finished dimension.
You can always remove a little more material later.
Step 4: Clean the Cut
Remove burrs and sharp edges.
Use a grinder to smooth the high spots without removing too much material.
Step 5: Fit the Branch Pipe
Place the saddle over the main pipe.
The two curved sides of the branch should sit around the outside diameter of the main pipe.
Check both sides.
If one side touches while the other has a large gap, remove material gradually from the high area.
Step 6: Check 90°
Use a square or angle finder.
The branch pipe should sit at:
90° to the main pipe.
Once the angle and fit are correct, the saddle is ready for the next fabrication step.
How to Cut a 45° Pipe Saddle
A 45° saddle uses the same basic idea, but now the branch approaches the main pipe diagonally.
Because of that angle, the saddle profile is no longer the same as a 90° saddle.
Do not simply cut a normal 90° fishmouth and lean the pipe over.
Step 1: Establish 45°
Position the branch pipe approximately where it will connect.
Set it at:
45° to the main pipe.
This is your finished branch angle.
Step 2: Use a 45° Saddle Template
Wrap the correct 45° saddle pattern around the branch pipe.
Align the template carefully with the pipe’s centerline.
Trace the entire cut profile.
The shape will look more stretched and uneven than the symmetrical 90° saddle because the pipe is intersecting the main pipe diagonally.
Step 3: Cut the Profile
Cut along your marks.
Take your time around the curved portions.
Stay slightly outside the finished line if you’re cutting by hand.
Step 4: Grind the High Spots
Clean the cut and lightly grind the areas preventing the branch from sitting correctly.
Don’t grind the entire saddle just because one small area is touching.
Find the high spot and work there.
Step 5: Fit It to the Main Pipe
Place the branch against the main pipe at 45°.
Check the contact around the saddle.
You want the branch to sit naturally against the main pipe without having to force it into position.
Step 6: Verify 45°
Check the centerline angle with an angle finder.
Your finished branch should be:
45° to the main pipe.
How to Cut a 22.5° Pipe Saddle
A 22.5° saddle is a much shallower intersection.
The branch almost runs alongside the main pipe before intersecting it.
That makes the saddle pattern longer and more stretched than a 90° or 45° saddle.
Step 1: Establish 22.5°
Position the branch at:
22.5° to the main pipe.
Make sure you’re measuring the actual angle between the pipe centerlines.
Step 2: Mark the 22.5° Saddle
Use a saddle template made specifically for the pipe diameters and a 22.5° intersection.
Wrap it around the branch pipe and align the reference lines.
Trace the entire profile.
Step 3: Cut the Saddle
Carefully cut along the pattern.
Because a 22.5° saddle can extend farther down one side of the branch, pay close attention to the long portion of the layout.
Step 4: Clean and Grind
Deburr the cut.
Test-fit before doing heavy grinding.
Remove only enough material to improve the fit.
Step 5: Fit the Branch
Place the branch against the main pipe at 22.5°.
The saddle should follow the curvature of the main pipe while keeping the branch at the required angle.
Step 6: Verify 22.5°
Check the centerline angle.
The finished branch should be:
22.5° to the main pipe.
If the angle is wrong, determine whether the problem comes from the layout, rotation, or excessive material remaining on the saddle before grinding more.
Quick Saddle Reference
Branch Angle
Saddle Type
General Shape
90°
Square saddle
Short and symmetrical
45°
Angled saddle
Longer, asymmetrical profile
22.5°
Shallow-angle saddle
Long, stretched profile
One Important Difference From Miter Cuts
With the miter method, the math was easy:
Finished angle ÷ 2 = cut angle.
That rule does not directly give you a saddle pattern.
A saddle is created by the intersection of two cylindrical surfaces. Its exact shape depends on three things:
Main pipe outside diameter + branch pipe outside diameter + intersection angle.
For example, a 3-inch branch saddled into a 6-inch main will have a different profile from a 3-inch branch saddled into another 3-inch pipe—even if both connections are 90°.
That is why a proper template is so useful.
The Simple Way to Remember It
For a saddle:
Choose your angle → establish the pipe sizes → make the correct template → wrap it → mark it → cut it → test-fit it → grind the high spots → check the angle.
At 90°, the saddle is relatively short and symmetrical.
At 45°, it becomes longer.
At 22.5°, it becomes longer and more stretched again.
The most important rule is simple:
Don’t grind a bad layout into a good fit. Get the layout right first.
A clean saddle starts with an accurate pattern, and an accurate pattern makes everything that follows easier.


