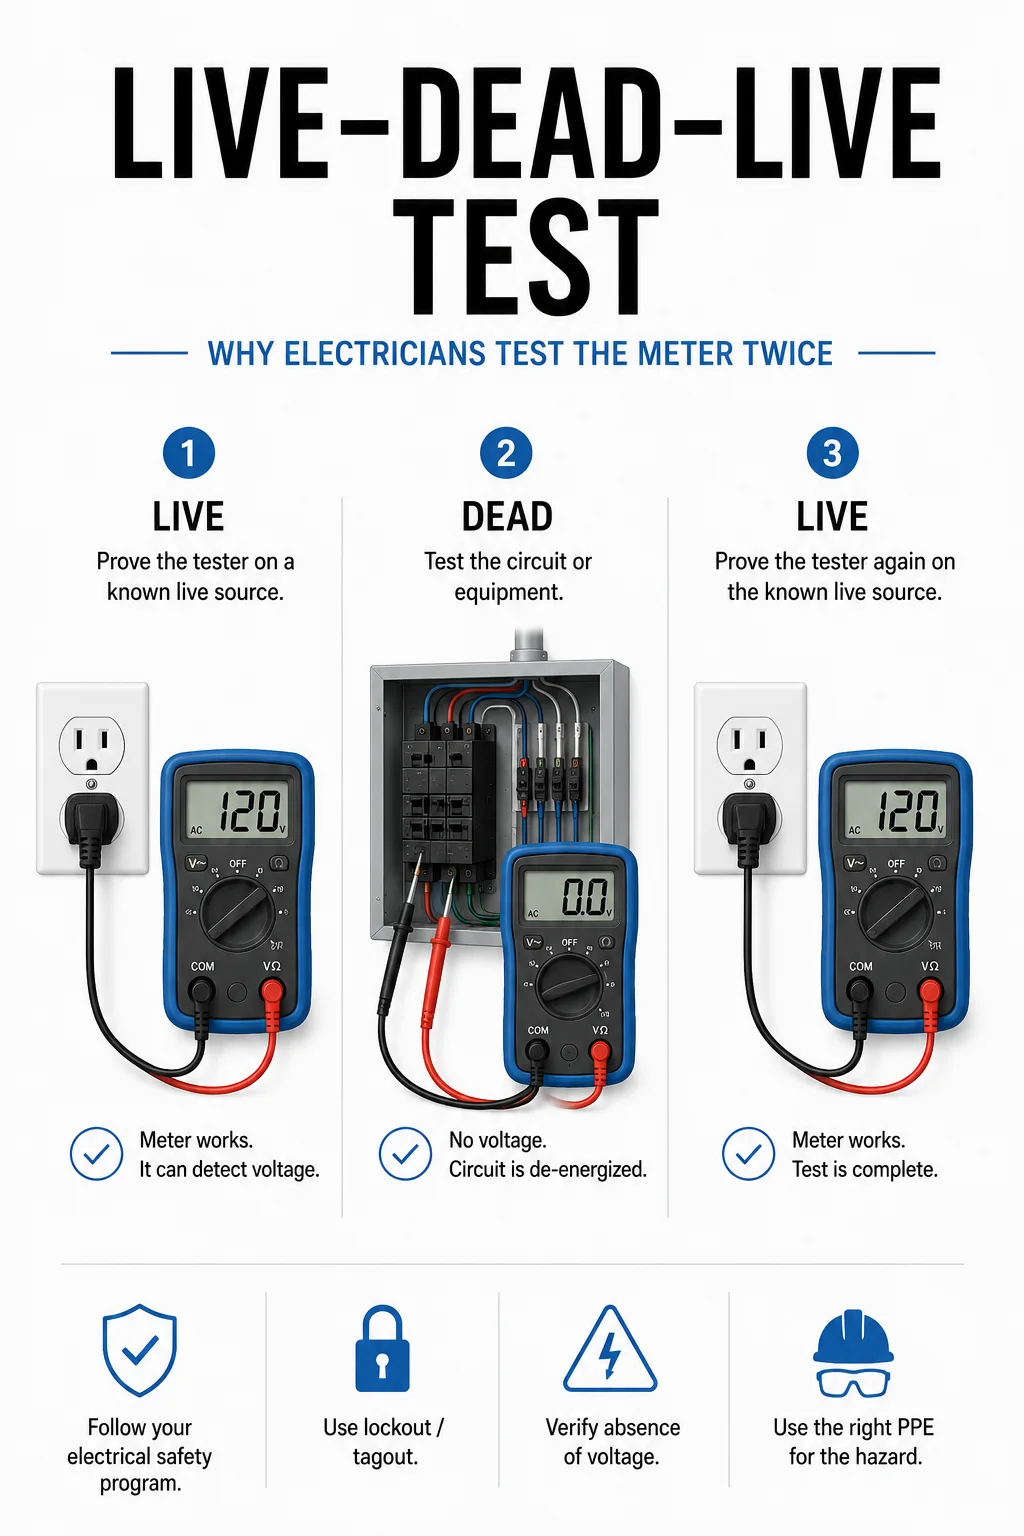
A multimeter reads 0 volts.
Does that prove the circuit is dead?
Not by itself.
The circuit might actually be de-energized. But the meter could also be set incorrectly. A test lead could be damaged. A probe could have lost contact. The instrument could have failed. Or the electrician could simply be testing the wrong points.
That is why qualified electrical workers use a simple but extremely important verification principle:
LIVE → DEAD → LIVE
The tester is checked against a known energized source. The circuit being worked on is tested for absence of voltage. Then the tester is checked against a known energized source again.
Another way to remember it is:
PROVE → TEST → PROVE
The purpose is simple: never trust a zero reading until you have confidence that the instrument producing that reading actually works.
This principle connects directly with the Næxon Learning Center guide How to Verify Absence of Voltage: Test Before You Touch, but live–dead–live deserves its own explanation because understanding why the meter is tested twice is just as important as memorizing the sequence.
Why Zero Volts Can Be Misleading
When a meter displays voltage, you have evidence that the instrument is detecting an electrical potential difference.
When it displays:
0 V
the situation is different.
Zero volts could mean the circuit is de-energized.
But zero could also result from a problem with the testing process.
Imagine a test lead has developed an internal break.
You place the probes across an energized circuit.
The meter displays:
0 V
The display itself may look perfectly normal. There may be no obvious indication that anything is wrong.
If you interpret that reading as proof that the circuit is safe to touch, the consequences can be severe.
The live–dead–live process is designed to reduce that uncertainty.
The First LIVE: Prove the Tester Before the Test
Before relying on the instrument to establish absence of voltage, verify that it can actually detect voltage.
Use an appropriate known energized source according to the test instrument manufacturer’s instructions and your employer’s electrical-safety procedure.
The meter should indicate the expected presence of voltage.
Conceptually:
Known energized source → Meter indicates voltage
Now you have established something important:
The tester was functioning immediately before the absence-of-voltage test.
This is the first LIVE.
You are not proving that the equipment you intend to work on is safe.
You are proving that the tester can detect voltage.
Those are two completely different questions.
The DEAD: Test the Actual Circuit
Once tester operation has been verified, test the circuit or equipment where the work will occur using the procedure appropriate for that electrical system.
This is the:
DEAD
portion of live–dead–live.
But “dead” describes the result you are attempting to verify. It should not be treated as an assumption before testing is complete.
Until absence of voltage has been established through the required procedure, the possibility of energized conductors remains.
That distinction is especially important because the act of testing may itself expose the qualified worker to energized electrical hazards.
Appropriate shock and arc-flash precautions may therefore still be necessary during the verification process.
The Næxon Learning Center guide Arc Flash vs. Electric Shock: What’s the Difference? explains why these are separate hazards that must be considered independently.
Do Not Test Only One Convenient Point
Electrical systems can contain multiple conductors, phases, sources, and voltage levels.
A single zero reading does not necessarily establish that everything inside an enclosure is de-energized.
Consider a typical three-phase system with:
Phase A
Phase B
Phase C
Depending on the system and established procedure, the qualified worker may need to evaluate the relevant phase-to-phase and phase-to-ground combinations.
That can include:
A–B
B–C
A–C
and the applicable phases to ground.
The exact verification method depends on the electrical system and safe-work procedure.
The important principle is:
Test the conductors and circuit parts that could create the hazard—not merely the easiest pair of points to reach.
Why Phase-to-Phase Matters
Imagine that Phase A is de-energized but Phase B remains energized.
You test:
A → Ground
and receive:
0 V
That reading may be accurate.
But it tells you about Phase A at those test points.
It does not prove that Phase B is de-energized.
If the worker mentally converts one zero reading into:
“The whole thing is dead,”
the testing procedure has failed even though the meter worked correctly.
Good voltage verification is not simply about obtaining zero.
It is about understanding what each measurement actually proves.
Why Phase-to-Ground Matters
Phase-to-phase testing provides important information, but it should not automatically be treated as the only necessary check.
The relationship between individual conductors and ground may reveal electrical conditions that an incomplete set of phase-to-phase measurements does not fully establish.
The appropriate combination of measurements depends on the system.
This is where qualified electrical knowledge matters.
A meter is only an instrument.
It does not decide which points need to be tested.
The electrician does.
The Second LIVE: Prove the Tester Again
After the circuit has been tested and the expected absence-of-voltage readings obtained, test the instrument again against the appropriate known energized source.
The tester should once again indicate voltage.
Conceptually:
Known live → Circuit test → Known live
If the meter worked immediately before the circuit test and works immediately afterward, there is much stronger evidence that the zero readings obtained between those two checks represented the actual electrical condition.
This is the second:
LIVE
and it is the part people sometimes question.
“If I already checked the meter before testing, why check it again?”
Because something could have changed during the test.
What Could Fail During Testing?
Test equipment is not indestructible.
A probe can become damaged.
A lead can develop an intermittent connection.
A connector can loosen.
The instrument can malfunction.
A setting can accidentally change.
A fuse or internal component can fail depending on the instrument and what occurred during testing.
The second live test addresses a critical question:
Was the tester still capable of detecting voltage after I received those zero readings?
If the answer is yes, confidence in the absence-of-voltage test increases.
If the tester fails the second live check, the earlier zero readings can no longer simply be trusted.
The electrical condition must be reassessed using the appropriate safe procedure.
Why the Test Source Matters
The known voltage source used to verify tester operation should be appropriate for the instrument and procedure.
The objective is not merely to make numbers appear on the display.
The objective is to demonstrate that the tester is capable of detecting the voltage condition relevant to the work.
Follow the tester manufacturer’s instructions and workplace electrical-safety procedures regarding acceptable verification methods.
Electrical test instruments are safety equipment.
Their limitations matter.
Meter Selection Matters Too
A meter may have the correct voltage range printed on the front and still be inappropriate for the electrical environment.
Industrial electrical systems can expose test equipment to significant transient energy.
That is why electricians need to understand measurement categories, or CAT ratings, along with the instrument’s voltage rating and manufacturer limitations.
A meter suitable for electronic bench work is not automatically the right instrument for testing industrial distribution equipment.
The Næxon Learning Center guide What CAT Ratings on Electrical Meters Actually Mean covers this subject in detail.
For live–dead–live verification, the principle is straightforward:
The test instrument must be suitable for the circuit and environment in which it is being used.
Inspect the Meter and Leads
Before depending on a meter for a safety-critical measurement, inspect it according to the manufacturer’s instructions and established procedures.
Pay attention to conditions such as damaged probe insulation, exposed conductors, cracked housings, loose connections, damaged leads, contamination, and other visible defects.
Also verify the meter is configured for the measurement being performed.
One particularly dangerous mistake is leaving a test lead connected to a current-measurement input and then attempting a voltage measurement.
Depending on the instrument and circuit, that can create a very different electrical path than intended.
Good electricians do not only ask:
“Is my meter on?”
They ask:
“Is my meter correctly configured for what I’m about to test?”
Auto-Ranging Does Not Eliminate the Need to Think
Modern digital multimeters can make voltage testing extremely convenient.
Auto-ranging meters automatically select an appropriate measurement range.
That convenience does not remove the need to understand the circuit.
The meter still needs to be set to the correct measurement function.
The probes still need to be connected correctly.
The test points still need to be selected correctly.
The instrument still needs to be appropriately rated.
And the electrician still needs to understand what the reading means.
Automation makes the tool easier to operate.
It does not replace electrical knowledge.
Non-Contact Testers Have a Different Job
A non-contact voltage detector can be useful for preliminary indication and troubleshooting.
It can quickly alert a worker that an electric field associated with voltage may be present.
But non-contact detectors have limitations.
Their response can be affected by conductor shielding, cable construction, distance, electric-field strength, environmental conditions, tester design, and other factors.
A non-contact indication should not automatically be treated as equivalent to the properly performed contact measurement required by the applicable absence-of-voltage procedure.
A useful distinction is:
Non-contact tester: “Voltage may be present.”
Proper absence-of-voltage verification: “The required circuit parts have been tested according to the established procedure.”
Those are not interchangeable statements.
Unexpected Voltage Means Stop and Investigate
Suppose the equipment is isolated and locked out, but the meter reads:
17 V
or:
38 V
or some other unexpected value.
Do not simply decide:
“That’s probably nothing.”
There are legitimate reasons a high-impedance digital meter may indicate a small voltage on a de-energized conductor. Capacitive coupling or induction from nearby energized conductors can sometimes create what is commonly called ghost voltage.
But an unexpected reading could also indicate:
backfeed, another power source, incorrect wiring, control voltage, induction, or an isolation problem.
Until the source is understood, the reading should not simply be dismissed.
The Næxon Learning Center lesson Induced Voltage Explained: Why a Disconnected Conductor Can Still Show Voltage explores this situation in greater depth.
Backfeed Is Why Source Identification Comes First
Imagine a machine supplied by a 480-volt feeder.
The main disconnect is opened and locked.
The obvious source is isolated.
But the machine also contains a separately supplied control transformer, UPS, generator connection, or another circuit entering the enclosure.
If the worker assumes the main disconnect controls everything, hazardous voltage may remain.
This is why live–dead–live is not a substitute for identifying energy sources.
It is one part of a larger electrical-safety process.
The Næxon Learning Center guide Backfeed Explained: How a Circuit Can Stay Energized After the Main Power Is Off covers the problem in greater detail.
Before testing, understand:
What can energize this equipment?
Stored Energy Can Remain After Isolation
Some electrical equipment can retain energy even after the normal supply has been disconnected.
Variable-frequency drives are a common industrial example.
Their DC buses can contain capacitors that may remain charged after input power is removed.
Other equipment may contain capacitors, batteries, or additional stored-energy systems.
Manufacturer-specified discharge times and procedures must be respected.
Do not assume:
Breaker off = all electrical energy immediately gone.
Source isolation and stored-energy control are separate parts of establishing a safe condition.
Live–Dead–Live Does Not Replace Lockout/Tagout
This distinction is critical.
You should not look at live–dead–live as:
“I tested it, so I don’t need lockout.”
Voltage testing does not prevent someone from restoring power.
Lockout/tagout controls the energy-isolating devices according to the required procedure.
Absence-of-voltage testing verifies the electrical condition.
They solve different problems.
A simplified way to think about it is:
Isolation removes the intended source.
Lockout/tagout controls re-energization.
Voltage verification checks the actual condition.
These processes work together.
The Næxon Learning Center guide Lockout/Tagout for Electricians: The Correct Sequence From Shutdown to Re-Energization goes deeper into the complete sequence.
Testing Is Still Electrical Work
There is an important paradox in absence-of-voltage verification.
You are testing the equipment because you believe it has been de-energized.
But until the test establishes that condition, you cannot rely on that belief.
Therefore, during the test:
the equipment must still be treated according to the potential electrical hazards involved.
That may require appropriate shock protection, arc-flash protection, boundaries, tools, PPE, and safe work practices based on the task and applicable requirements.
The meter does not make the hazard disappear.
It helps establish whether the hazard is actually absent.
FR Clothing and Electrical Work
Industrial electricians frequently work in facilities where flame-resistant workwear is part of everyday site requirements. Næxon FR Shirts can serve as industrial workwear where their specific certifications and ratings satisfy the site’s clothing requirements.
However, FR does not automatically mean arc-rated.
When a task requires arc-flash protection, the worker must use clothing and PPE carrying the appropriate arc rating for the assessed exposure and meeting the employer’s electrical-safety requirements.
Never substitute an ordinary FR garment for required arc-rated PPE simply because both are designed to resist flame.
The Næxon Learning Center article Arc Flash vs. Electric Shock: What’s the Difference? explains why arc-flash PPE must be matched to the actual electrical hazard.
Why Experienced Electricians Develop a Routine
Electrical testing should not depend on memory under pressure.
Good electricians develop disciplined routines.
Meter configuration.
Lead inspection.
Known source.
Circuit test.
Known source again.
When that sequence becomes habitual, it becomes harder to skip a critical step simply because the job seems routine.
That matters because familiarity can create complacency.
A worker may have tested the same type of equipment hundreds of times.
The 101st cabinet does not know that.
Electricity behaves according to the circuit conditions in front of you—not according to your previous experience.
The Five-Second Question
Before trusting a zero reading, ask yourself:
“How do I know my tester works?”
If the answer is:
“Because it usually does,”
that is not verification.
If the answer is:
“Because I proved it immediately before this test and proved it again immediately afterward,”
you have followed a much stronger process.
That is the logic behind live–dead–live.
Remember: Prove → Test → Prove
The entire concept can be reduced to three words:
PROVE → TEST → PROVE
First:
Prove the instrument can detect voltage.
Second:
Test the appropriate circuit parts for absence of voltage.
Third:
Prove the instrument can still detect voltage.
That sequence is simple enough to remember, but it exists for a serious reason.
A zero on a screen is only information.
You need confidence that the instrument producing that zero was functioning properly.
Never Let Zero Become an Assumption
Electrical work demands evidence.
A breaker position is not enough.
A disconnect handle is not enough.
A label is not enough.
A machine that stopped running is not enough.
And even a meter displaying zero should not be accepted blindly.
Identify the sources.
Isolate them.
Apply the required energy-control procedure.
Use the appropriate tester.
Prove it.
Test the circuit.
Prove it again.
Then proceed according to the established electrical-safety procedure.
LIVE → DEAD → LIVE.
It takes only a few words to remember.
But understanding why those words matter is part of what separates simply using a meter from performing electrical work professionally.


