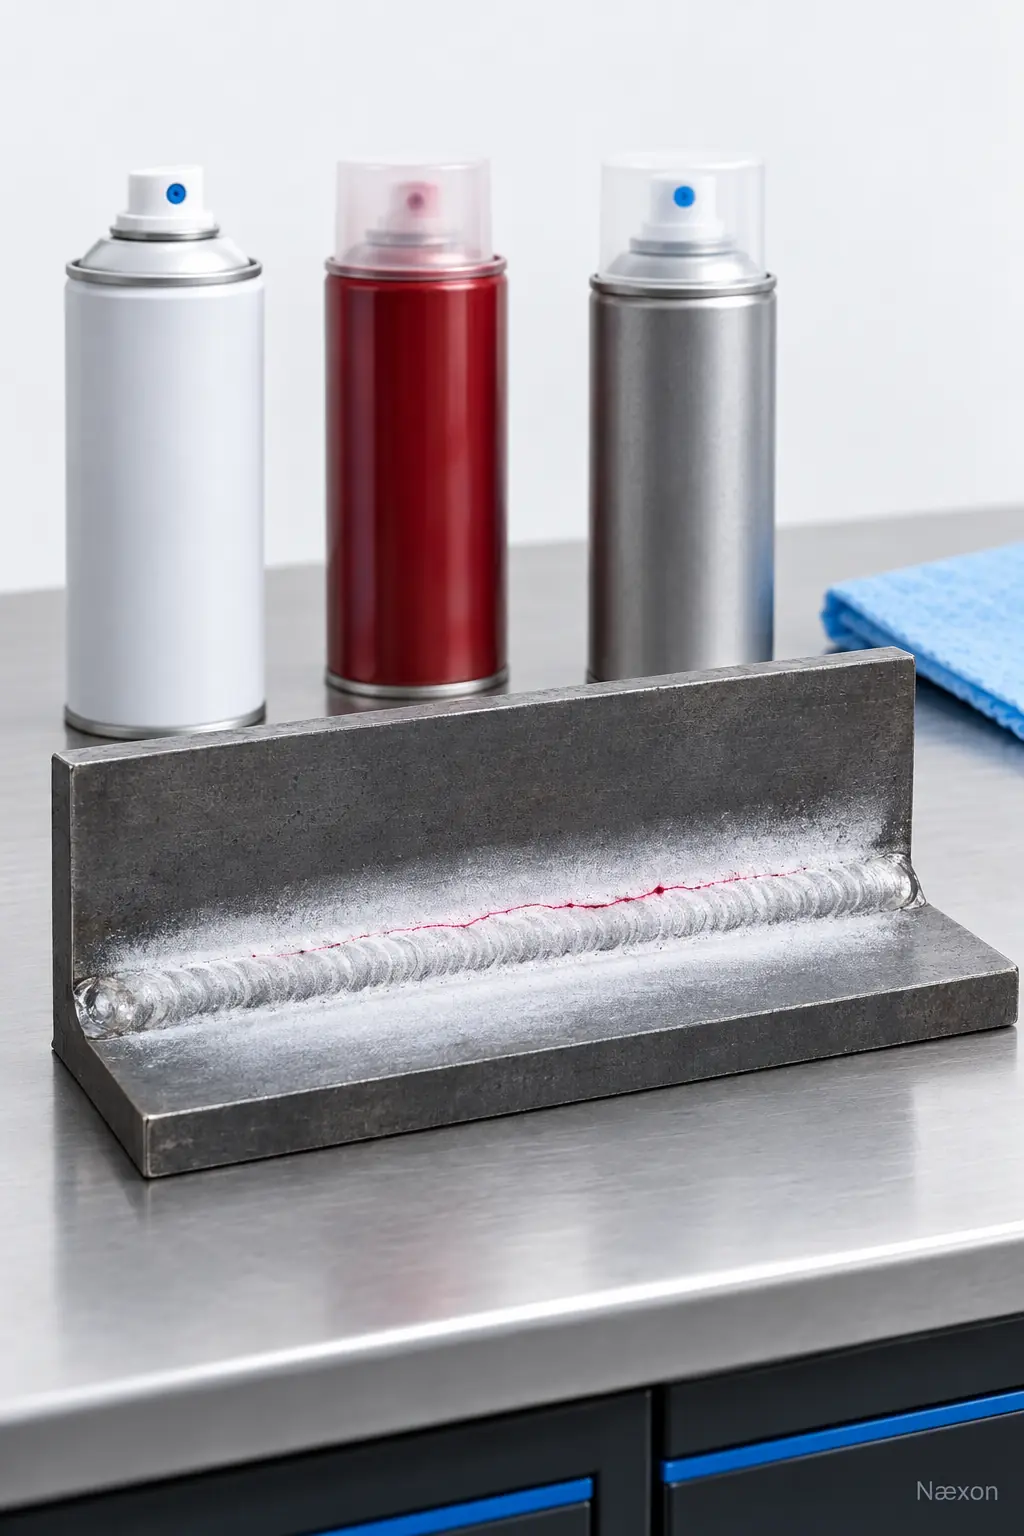
Evening Edition · QC inspectors · Apprentice to intermediate · Field Skill · 10-minute read
What you will learn: Explain what visible liquid penetrant testing can reveal, protect the indication through each processing step, recognize common false-background conditions, and document a result without inventing acceptance criteria.
A repaired weld looks clean under white light, but the penetrant test produces a red line beside the toe. Is it a crack, penetrant trapped in rough grinding marks, or a result that the inspection process itself made unreliable? The answer cannot come from the color alone. It starts with knowing what the method can detect and whether every processing step preserved a valid indication.
Visible liquid penetrant testing, often shortened to PT, LPI, or dye penetrant inspection, is a nondestructive method for finding discontinuities that are open to the surface of a suitable nonporous material. Penetrant wets the surface and enters fine openings. After excess surface penetrant is removed, developer draws trapped penetrant back toward the surface and provides a contrasting background. The inspector then evaluates the resulting indication under the lighting required by the procedure.
This lesson is an educational process check, not an inspection procedure or acceptance standard. The approved written procedure, applicable construction or repair code, product data sheets, safety data sheets, part temperature, lighting requirements, qualified supervision, and inspector certification control real work. Do not use penetrant materials without the required ventilation, ignition controls, chemical PPE, and waste-handling practices.
What penetrant testing proves—and what it cannot prove
PT can reveal a path that opens to the examined surface. It can be used on many nonporous materials and is not limited to ferromagnetic metals. That makes it useful for stainless steel, aluminum, nickel alloys, and other approved materials where magnetic-particle testing may not apply. Material compatibility still has to be established; some plastics, ceramics, coatings, or porous surfaces can stain, absorb chemicals, or produce an unreadable background.
The method cannot reveal a completely subsurface discontinuity because the liquid needs a surface opening. It also does not automatically identify an indication as a rejectable defect. An indication is evidence produced by the test. A discontinuity is an interruption in the material. A defect is a discontinuity that fails the applicable acceptance criteria. The qualified inspector evaluates relevance, location, shape, size, and the governing requirements before making that decision.
Surface condition strongly affects the result. Oil, grease, paint, scale, water, old developer, and cleaning residue can block an opening. Rough grinding, spatter, undercut, threads, sharp corners, and porous deposits can hold penetrant on the surface and create background that makes a real indication harder to see. A clean-looking surface is not necessarily a clean inspection surface.
The process is a chain
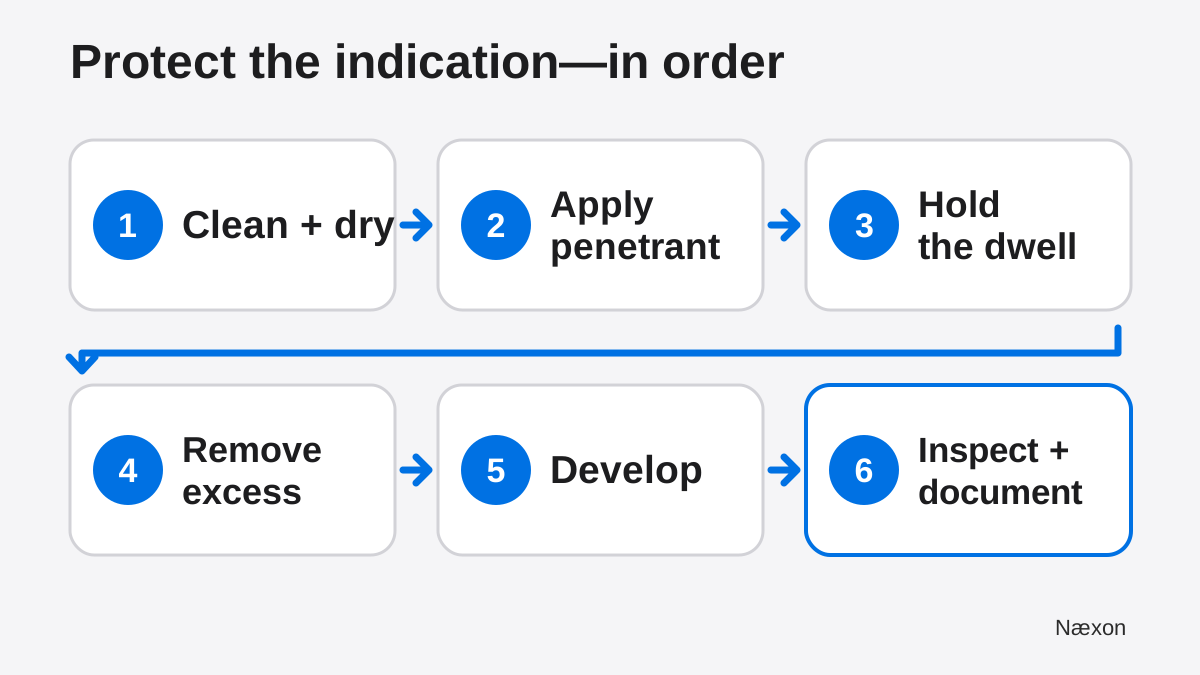
Each stage protects the next one. Precleaning opens the route into a discontinuity. Dwell time allows penetrant to enter. Controlled excess removal clears the surface without washing penetrant out of the opening. A thin, even developer layer promotes bleedout and contrast. Required lighting and observation time make the indication visible. Postcleaning removes inspection residue when the procedure requires it.
Visible and fluorescent penetrant systems are not interchangeable shortcuts. Visible systems use a colored dye viewed under the specified white-light conditions. Fluorescent systems use dye that fluoresces under ultraviolet-A light and require their own controlled viewing conditions. Removal methods also differ: water-washable, solvent-removable, and post-emulsifiable systems must be processed according to the selected system and procedure.
Worked example: verify dwell time and protect the conclusion
Assume a supervised training procedure specifies a minimum penetrant contact time of 15 minutes for a particular weld coupon at the recorded temperature. Full surface coverage is completed at 22:14:30, and excess-removal begins at 22:29:45. These values are illustrative; they are not a universal dwell time or a project acceptance requirement.
Let tstart be 22:14:30 and tend be 22:29:45. The elapsed time is 15 minutes 15 seconds. Converting the result gives (15 min × 60 s/min) + 15 s = 915 seconds. The procedure minimum in the example is 15 min × 60 s/min = 900 seconds. Because 915 s is 15 s greater than 900 s, the recorded contact time meets the illustrative minimum.
Independently check by adding the elapsed time to the start: 22:14:30 + 15:15 = 22:29:45. A reasonableness check also works: the ending time is a little more than 15 minutes after the start, not merely five minutes or nearly an hour later.
That calculation verifies only one process variable. It does not prove that the surface was clean, the penetrant stayed wet, the products were compatible, the part remained in the qualified temperature range, excess removal was correct, the developer coat was suitable, or the indication met acceptance criteria. The defensible record separates observed facts from the acceptance decision.
The most common damaging shortcut
With a solvent-removable visible penetrant system, the surface is commonly wiped first and then finished with a clean cloth lightly moistened as the product instructions allow. Flooding the test surface directly with cleaner or remover can pull penetrant from a surface opening. The background may look beautifully clean while the indication becomes weak or disappears. A visually neat part can therefore be an invalid test.
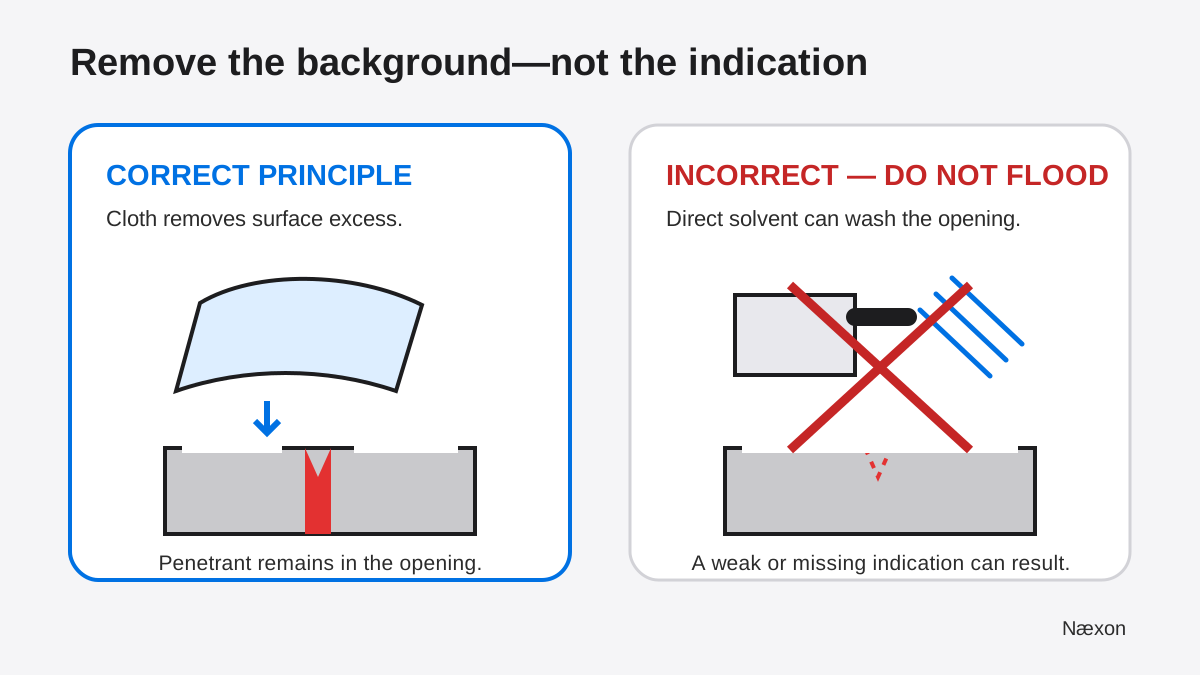
The opposite error is leaving too much penetrant on the surface. Heavy red background reduces contrast and can hide a fine indication. Developer thickness matters too. A thin, even coating supports bleedout and contrast; a heavy coating can mask an indication, while an incomplete coating can make the inspection area inconsistent. Follow the product and procedure instead of judging the coat by appearance alone.
A practical field sequence
- Confirm the examination basis. Identify the current drawing, weld or part location, material, examination extent, approved PT procedure, acceptance criteria, personnel qualification, product family, batch status, and required lighting and temperature controls.
- Establish chemical and work controls. Review the safety data sheets and site controls. Provide ventilation, remove ignition sources where required, wear specified PPE, protect nearby equipment, and control used cloths and waste.
- Prepare the surface. Remove coatings and contamination by an approved method. Do not smear metal over a suspected opening with uncontrolled grinding or peening. Let the final cleaner evaporate so the inspection surface and any openings are dry.
- Apply penetrant completely. Cover the entire defined examination area. If the liquid pulls back into droplets or refuses to wet the surface, stop and investigate contamination or compatibility rather than continuing.
- Control and record dwell. Start timing at the point defined by the procedure, keep the area in the required condition, and record the actual time and relevant temperature.
- Remove only the excess. Use the method assigned to that penetrant system. Check that the surface background is acceptable without scrubbing, flooding, or over-washing the openings.
- Apply developer correctly. Prepare or agitate it as instructed, apply the required thin and even coating, and observe the specified development time.
- Inspect and document. Verify the required lighting, examine the full area, mark or photograph locations as permitted, and record indication position, orientation, and measured characteristics under the approved procedure.
- Evaluate and close out. Apply only the governing acceptance criteria, obtain required review, postclean the part, and restore corrosion protection or cleanliness when specified.
Reading patterns without overcalling them
A narrow linear bleedout may track a crack-like or lack-of-fusion-type surface opening, while rounded dots may come from porosity or another small surface opening. Those shapes are useful observations, not automatic diagnoses. Grinding scratches, weld ripples, sharp geometry, and incomplete excess removal can produce nonrelevant or confusing patterns. Record what the indication actually does before naming its cause.
Watch how an indication develops. A tight opening may begin as a fine line and broaden as penetrant bleeds into the developer. Heavy background that appears everywhere points toward cleaning, removal, surface-finish, or coating problems rather than one isolated discontinuity. If the indication is smeared, wiped through, or hidden by developer, stop and follow the approved repeat-examination rules; do not quietly reinterpret a damaged test.
Troubleshooting unreliable results
Penetrant beads up or pulls away: suspect oil, water, coating, incompatible residue, or a surface the selected system cannot wet. Stop, clean by the approved method, dry fully, and re-establish the process.
The whole area stays red: excess removal may be incomplete, the surface may be rough or porous, or the wrong removal method may have been used. Do not add a heavy developer coat to hide the background.
No indications appear on a known reference check: remove the system from use and investigate materials, contamination, processing, lighting, reference standard condition, and procedure compliance. A blank result is not proof that the part is sound.
A fine line disappears during cleaning: over-removal may have washed penetrant from the opening. Treat the examination as compromised and follow the written repeat-examination process.
The indication is at a thread, edge, keyway, or rough weld toe: geometry may retain penetrant. Document the exact location and let the qualified evaluator determine relevance. Do not grind or alter the component merely to make the pattern disappear.
Common mistakes
Frequent mistakes include treating PT as a three-can spray routine, mixing products that are not an approved system, skipping final drying, starting the dwell clock inconsistently, allowing penetrant to dry, spraying remover directly on a solvent-removable examination area, applying developer too heavily, inspecting before or after the permitted development window, using uncontrolled lighting, and calling every red mark a crack.
Another serious mistake is copying a dwell time or acceptance limit from a different job. Material, process, temperature, penetrant family, discontinuity type, code, and product instructions can change the required method. General training can explain the mechanism; only the controlling documents authorize the actual inspection.
Field Rules
- PT finds surface-connected openings; it does not see a sealed subsurface flaw.
- A clean, dry, compatible surface is part of the examination—not housekeeping after it.
- Use one approved penetrant system and its assigned removal method.
- Remove surface excess without washing penetrant from openings.
- Apply developer thinly and evenly under the written procedure.
- Describe the indication before deciding what it means.
- Acceptance comes from the governing criteria and qualified evaluation.
Knowledge Check
- A technician sprays cleaner directly across a solvent-removable test area after dwell because the background clears faster. What is the technical concern?
- A red line appears at a weld toe. What can the inspector conclude immediately, and what still requires evaluation?
- The penetrant was applied at 08:05:20 and excess-removal began at 08:20:50. What contact time should be recorded?
- A rough casting produces red background across the entire area. What should the inspector check before calling multiple defects?
Answers
1. Direct flooding can wash penetrant from a surface opening and weaken or erase the indication. The test may look cleaner while becoming less reliable.
2. The inspector can record a linear indication at the weld toe. Whether it is relevant, what discontinuity produced it, and whether it is acceptable must be determined under the approved procedure and governing criteria.
3. The elapsed time is 15 minutes 30 seconds. Check it by adding 15:30 to 08:05:20 to reach 08:20:50.
4. Check surface porosity and roughness, precleaning, penetrant-system compatibility, excess-removal technique, developer coating, and the procedure's suitability for that material and finish. Broad background is a process-quality warning, not automatic proof of many defects.
Practical Exercise
On paper, draw a six-box flow beginning with “clean and dry” and ending with “inspect and document.” Under each box, write one failure mode and the evidence it could create. Include direct solvent flooding under excess removal and a heavy coating under developer. Your exercise is complete when every failure mode is tied to a visible symptom and a corrective principle, and none of the corrections invents a dwell time or acceptance limit. Check your sequence against Figure 1.
Related learning
Start with bridge cam gauge setup and weld measurement to strengthen your visual-inspection foundation. Review how weld undercut forms and appears so a surface profile is not confused with an unexplained indication. Continue with weld porosity causes and troubleshooting to connect rounded surface indications with fabrication conditions while keeping acceptance decisions inside the governing inspection procedure.